Security Note
There are several permissions required in Group Administration to see each piece of data on an event's Details page. These are inclusive of, but not limited to:
- Object security permissions to view the event, associated locations, and associated resources
- Basic Options: 3.0 Register for an Event
- Basic Options: 4.0 View Pricing on Events
- Basic Options: 8.0 View Audit Trail on Events
- Basic Options: 8.0 View Contacts
- Basic Options: 10.0 View Tasks List
- Basic Options: 14.0 Send Emails
- Administrative Options: 3.0 View and Edit Event Registration
- Tools Access: 4.0 Access to LYNX Tool
- Tools Access: 7.1 Access to Event Chat
If you are missing a feature that you believe you should have access to, please contact your 25Live administrator.
Each event in 25Live has its own Details page where you can find all of its data, including the event state, occurrence date(s), scheduling contacts, tasks, relationships with other events, assigned location(s), and more.
At the top, the summary lists the event name, event title, event state, event reference ID, dates (including additional time and repeat occurrences), times, location(s), and resource(s) for the event. Use the star icon (![]() ) next to the event name to add it to your favorites.
) next to the event name to add it to your favorites.
 Image: A summary of the event is located at the top of the event page.
Tip
Location, resource, organization, contact, and event names are clickable in 25Live. These links will take you to the Details page for each of these objects.
Event Tabs
 Mobile Note
 Mobile Note
In the 25Live mobile application available for iOS and Android, event tabs appear in a dropdown selection list, as shown below.
 Image: Mobile app and browser views show event tabs in a dropdown selection list.
Below are descriptions of each of the event details tabs and their uses. Please note that what you are able to view on this page will depend on your security settings and configurations. If there are settings you think you should be able to see or edit, please contact your 25Live Administrator.
 Image: The tabs you see in 25Live will depend on your system's configurations and your security permissions.
Details
 Image: The Details tab includes several collapsible sections that allow inline editing for users with the appropriate permissions.
- Edit Mode - Set the toggle to On to enable inline editing.
- Register - Click to register for this event. If you are already registered, this link will be updated to View Registration.
- Edit Event - Open this event in the event form.
- For more about Event States, see Choosing an Event State.
- Event State - Update the event state.
- Please note that updating the Event State from the Event Details can trigger Event Save Email scenarios to send.
- Note: The Trigger Event Save Actions button only appears on the Event Details and occurrence inline edit views when at least one Event Save Email scenario is configured to trigger on inline edit. Scenarios with no trigger actions selected are considered to apply to all trigger types, including inline edit. If no qualifying scenarios exist for your instance, the button is hidden.
- Please note that updating the Event State from the Event Details can trigger Event Save Email scenarios to send.
Note: Full Cancellation Rights Require Unassign Permissions
If the event owner has access to the Cancelled event state but does not have Unassign rights for objects assigned to an event, they will have to request the cancellation. (This scenario assumes that the event owner is not also the scheduler.)  When a user requests cancellation, the system will ask the user to provide the reason for cancelling. Then, a To Do request with that information will be sent to the scheduler, who can then cancel the event. |
 |
Additional event information is available in collapsible sections:
|
 Image: 25Live mobile app view. Image: 25Live mobile app view. |
For more information, please see Event Data Overview.
Occurrences
The Occurrences tab lists the Date, Start Time, End Time, and Additional Details of each event occurrence. On the left, there are panels for the Event Preferences. If the event has multiple locations/resources, there will also be a Filter by Locations/Resources panel.
For more information, please see Viewing and Editing Event Occurrences.
 Image: The Occurrences tab shows the date, time, location(s), and resource(s) for each occurrence.
Calendar
The Calendar tab displays a calendar of occurrences for the event you are viewing.
For more information, please see Working With Calendar Views in 25Live.
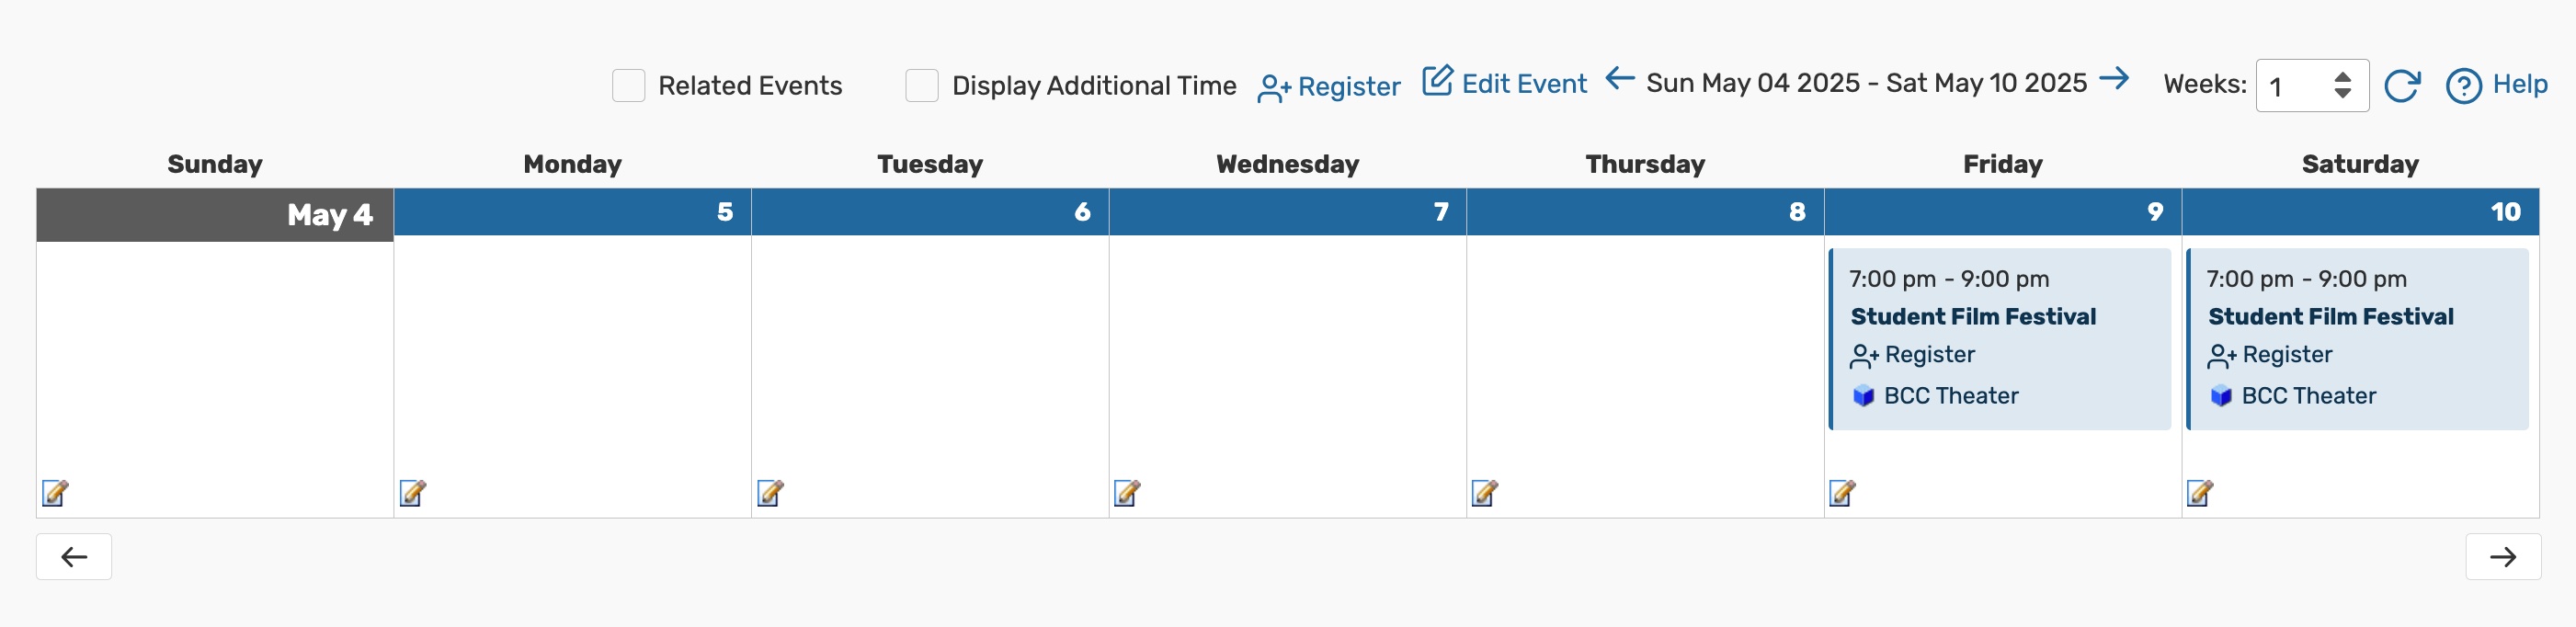 Image: The Calendar tab shows each of the event's occurrences by week.
Schedule
The Schedule tab shows a color-coded block for each event occurrence in the event you are viewing. The blocks are laid out on a grid to highlight the dates and hours that each occurrence takes place. This view is interactive, allowing you to reschedule occurrences right from the grid. Additional time (pre-, setup, post-, takedown) will show in a differing pattern or shade within the event block. This tab may also display the "Show Waitlist" checkbox when reservations are waiting for an event block.
For more information, please see Working With Availability Views in 25Live.
 Image: The Schedule tab shows all of the event occurrences laid out in a grid.
Task List
In the Task List tab, the details of tasks associated with this event (or related events) are displayed. This view will look different depending on whether your 25Live instance has Tiered Workflow enabled.
Tiered Workflow is an automated process that links an event's tasks together so that they are completed in a predetermined order. This means that some tasks cannot be completed until others have been. Each section of tasks can be expanded and collapsed, and will indicate whether the tasks are completed or pending.
If Tiered Workflow is not enabled in your instance, a table will display each of the event's tasks, which do not need to be completed in a specific order.
You can use the appropriate action buttons to complete a task:
- Approve or Deny to complete an approval notification
- Assign or Deny to complete a location or resource assignment request
- Complete or Ignore to complete a To Do task
For more information, please see Viewing Tasks, Tiered Workflow, & Completing Tasks.
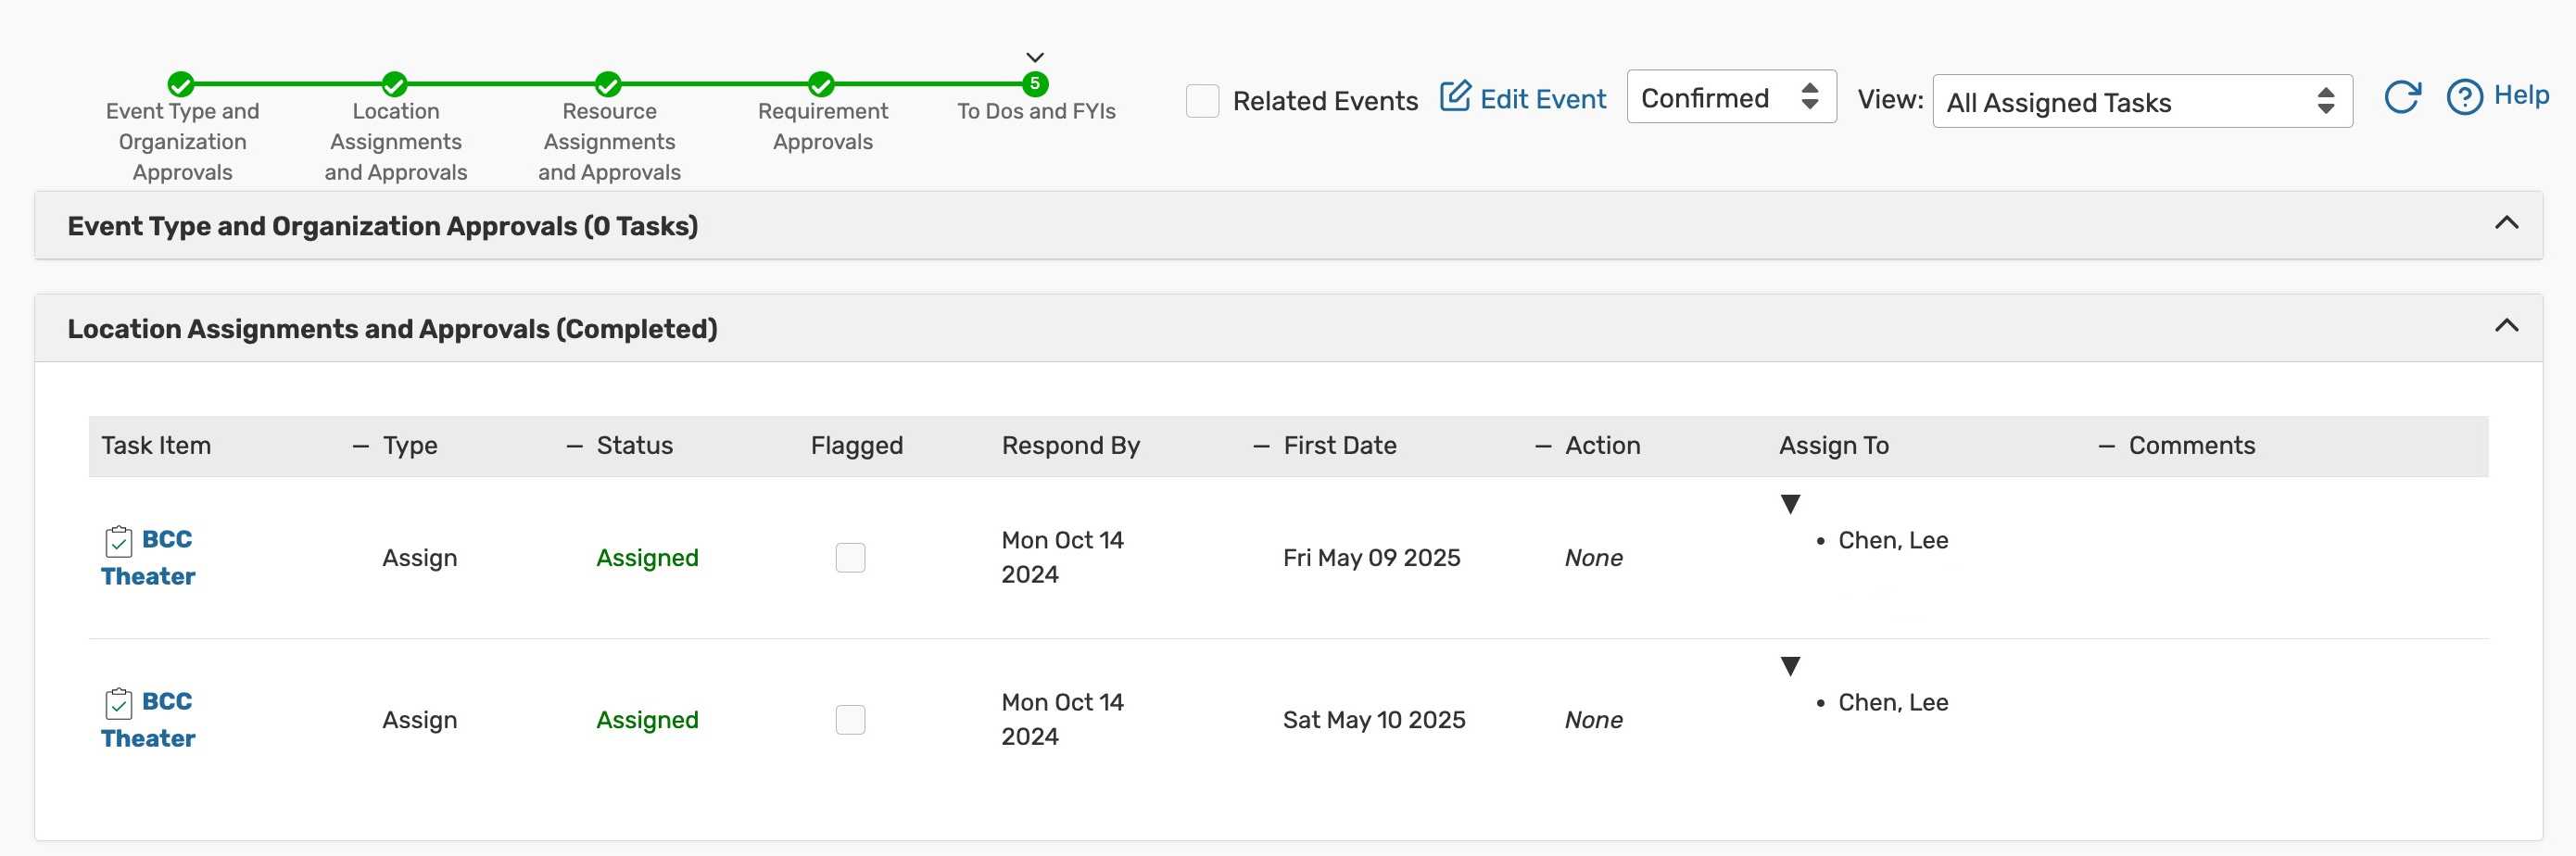 Image: Open the Task List to see completed, in progress, and pending tasks. If you do not have Tiered Workflow enabled in your instance, your tab will look different than the image above.
Pricing
For events that have associated costs, you can use the Pricing tab to make pricing adjustments, export invoices, manage payments, and more.
For more information, please see Viewing and Modifying Event Pricing, Generating an Invoice, & Managing Payments in 25Live.
 Image: Open the Pricing tab to see all costs associated with this event.
Registration
For events that allow registration, you can manage attendance information from the Registration tab.
For more information, please see Registering for an Event in 25Live & Managing 25Live Event Registrations.
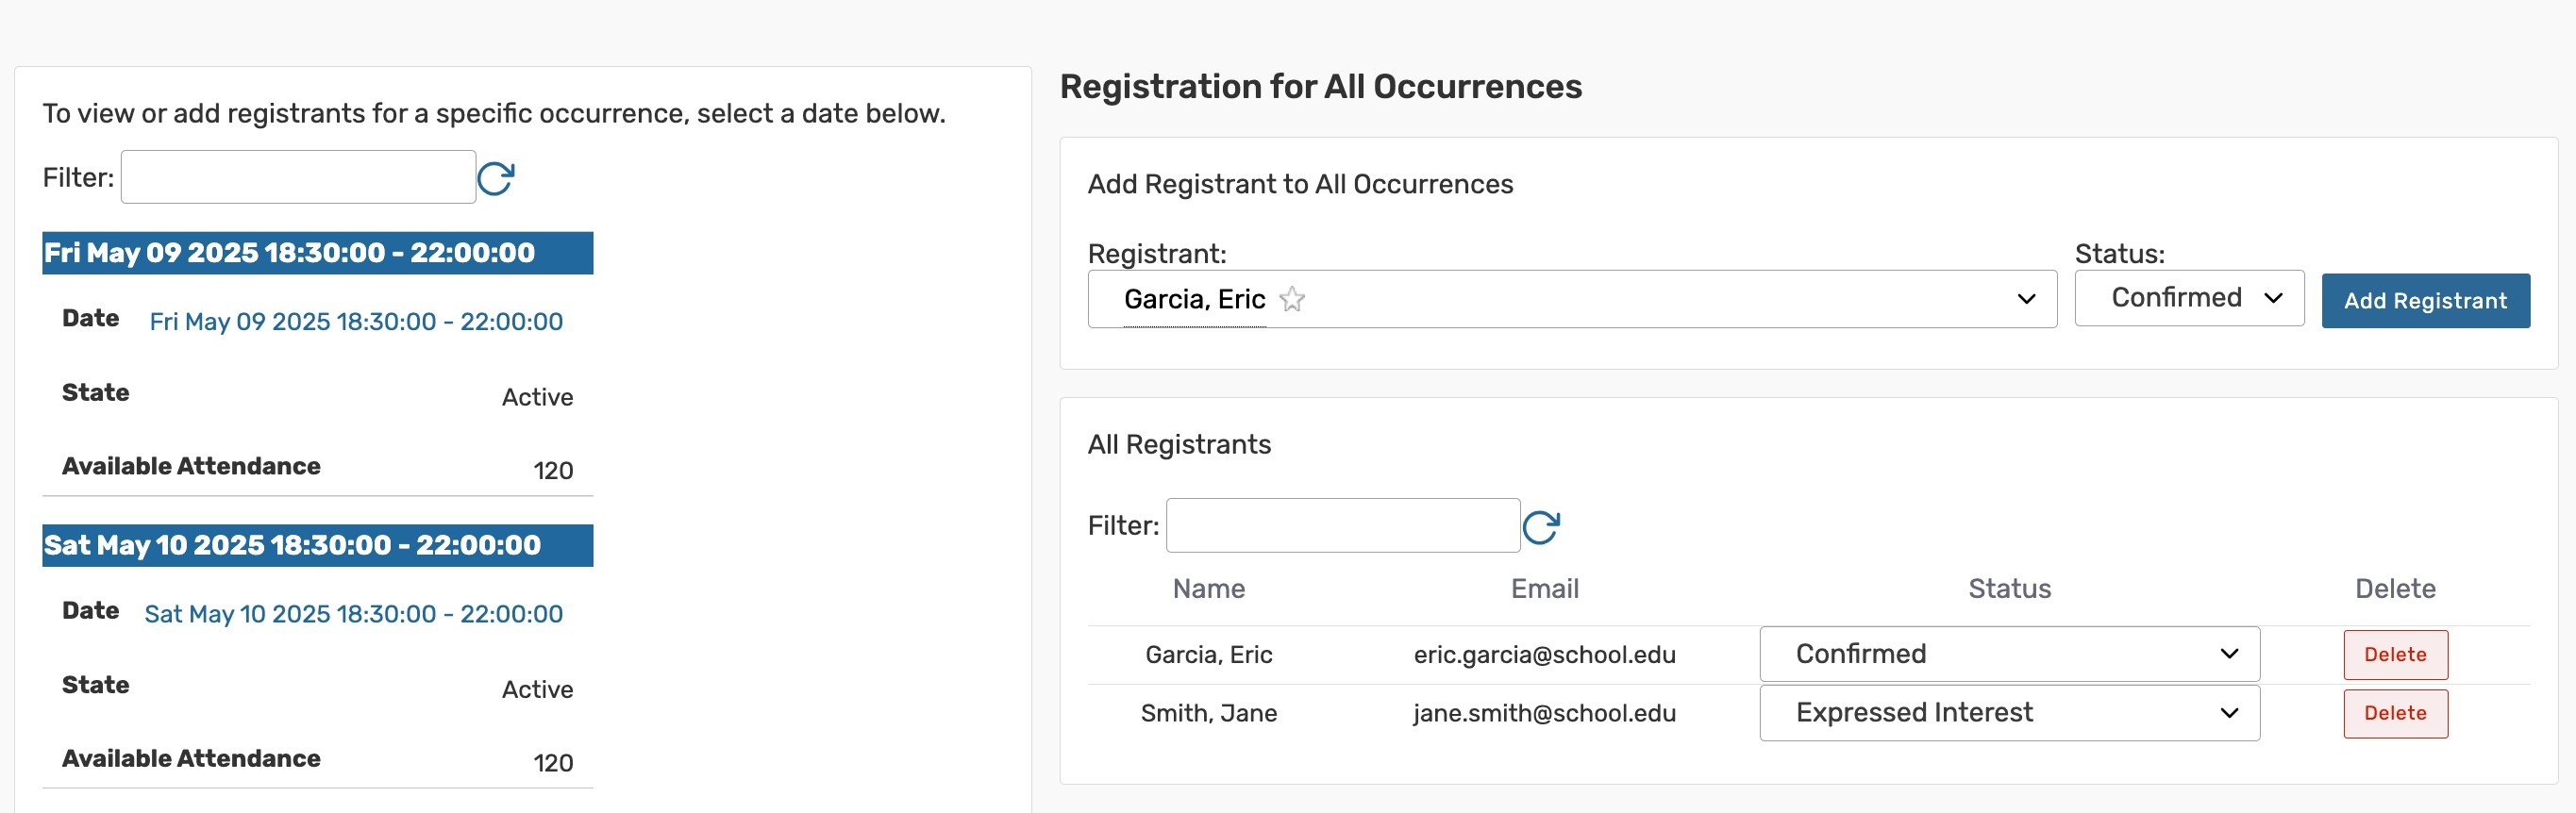 Image: View and update the event registrants in the Registration tab.
LYNX
If a 25Live event has been imported via the Series25 LYNX Interface, you can use the LYNX tab to suspend SIS imports and exports for the section you are viewing.
For more information, please see Pausing a Section from the LYNX Tab in 25Live.
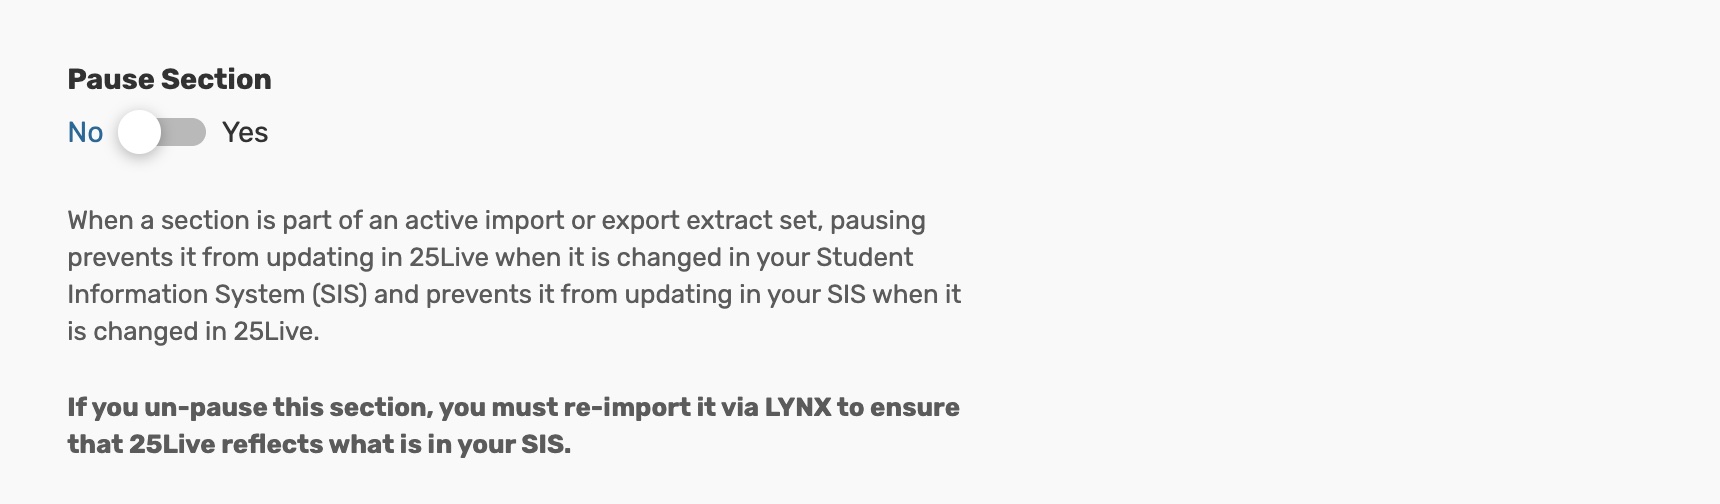 Image: The LYNX tab has a Pause Section toggle that can be used to suspend imports and
 Audit Trail
The Audit Trail tab displays a sortable table of changes to this event. Tap or click the Date, User, or Action column headings to sort by those columns.
For more information, please see Viewing an Event's Audit Trail.
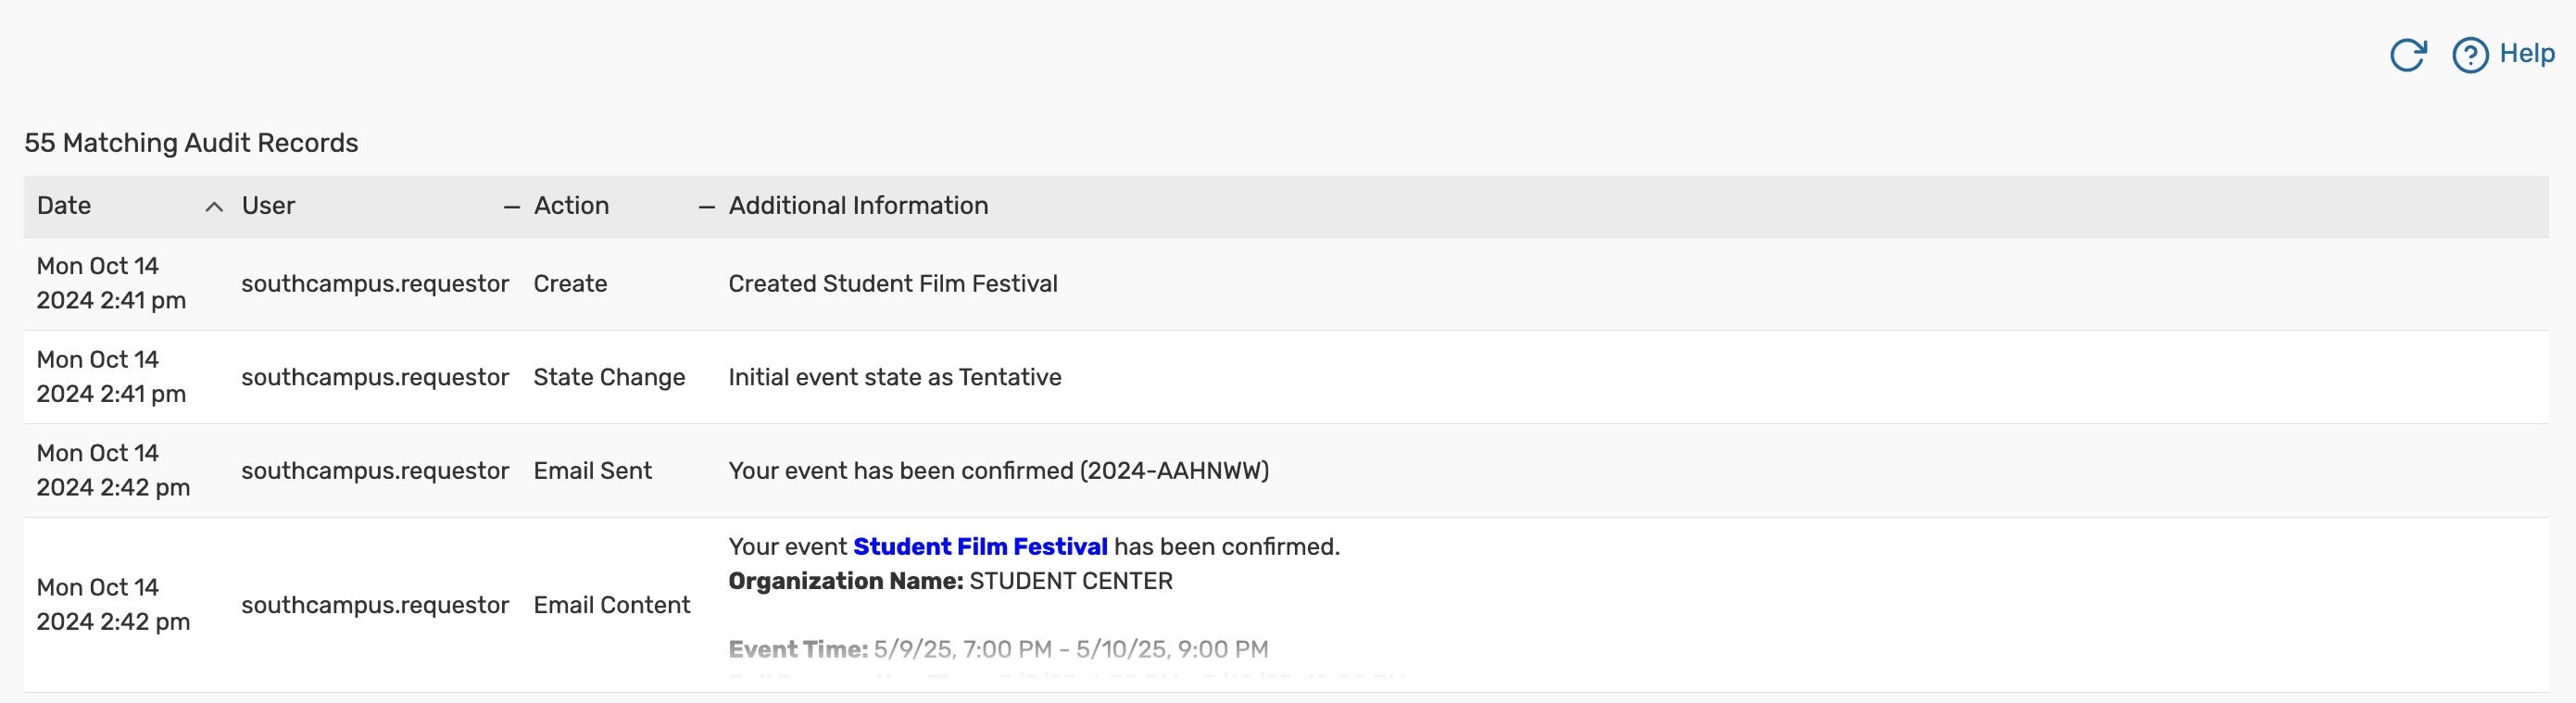 Image: Use the Audit Trail to see a record of changes made to this event.
Scheduled Emails
The Schedule Emails tab shows a record of scheduled emails, including those created from the Email Event section of the More Actions menu or from Event Save Emails.
For more information, please see Saving, Printing, Emailing, and Scheduling Reports.
 Image: Open the Scheduled Emails section to view the audit trail of emails scheduled through the Email Event
More Actions Menu Options
Expand the More Actions menu to see additional actions available for events.
 Image: Tap More Actions to open additional event options.
To close the display, tap the Collapse button.
 Image: Use the Collapse button to close the More Actions menu.
Edit Event
Edit this event or related events.
For more information, see Editing Individual Events With the Event Form.
 Image: If an event is in a related event set, you will also have the option to copy related events.
Copy Event
Duplicate this event.
For more information, see Copying Events & Copying Related Events.
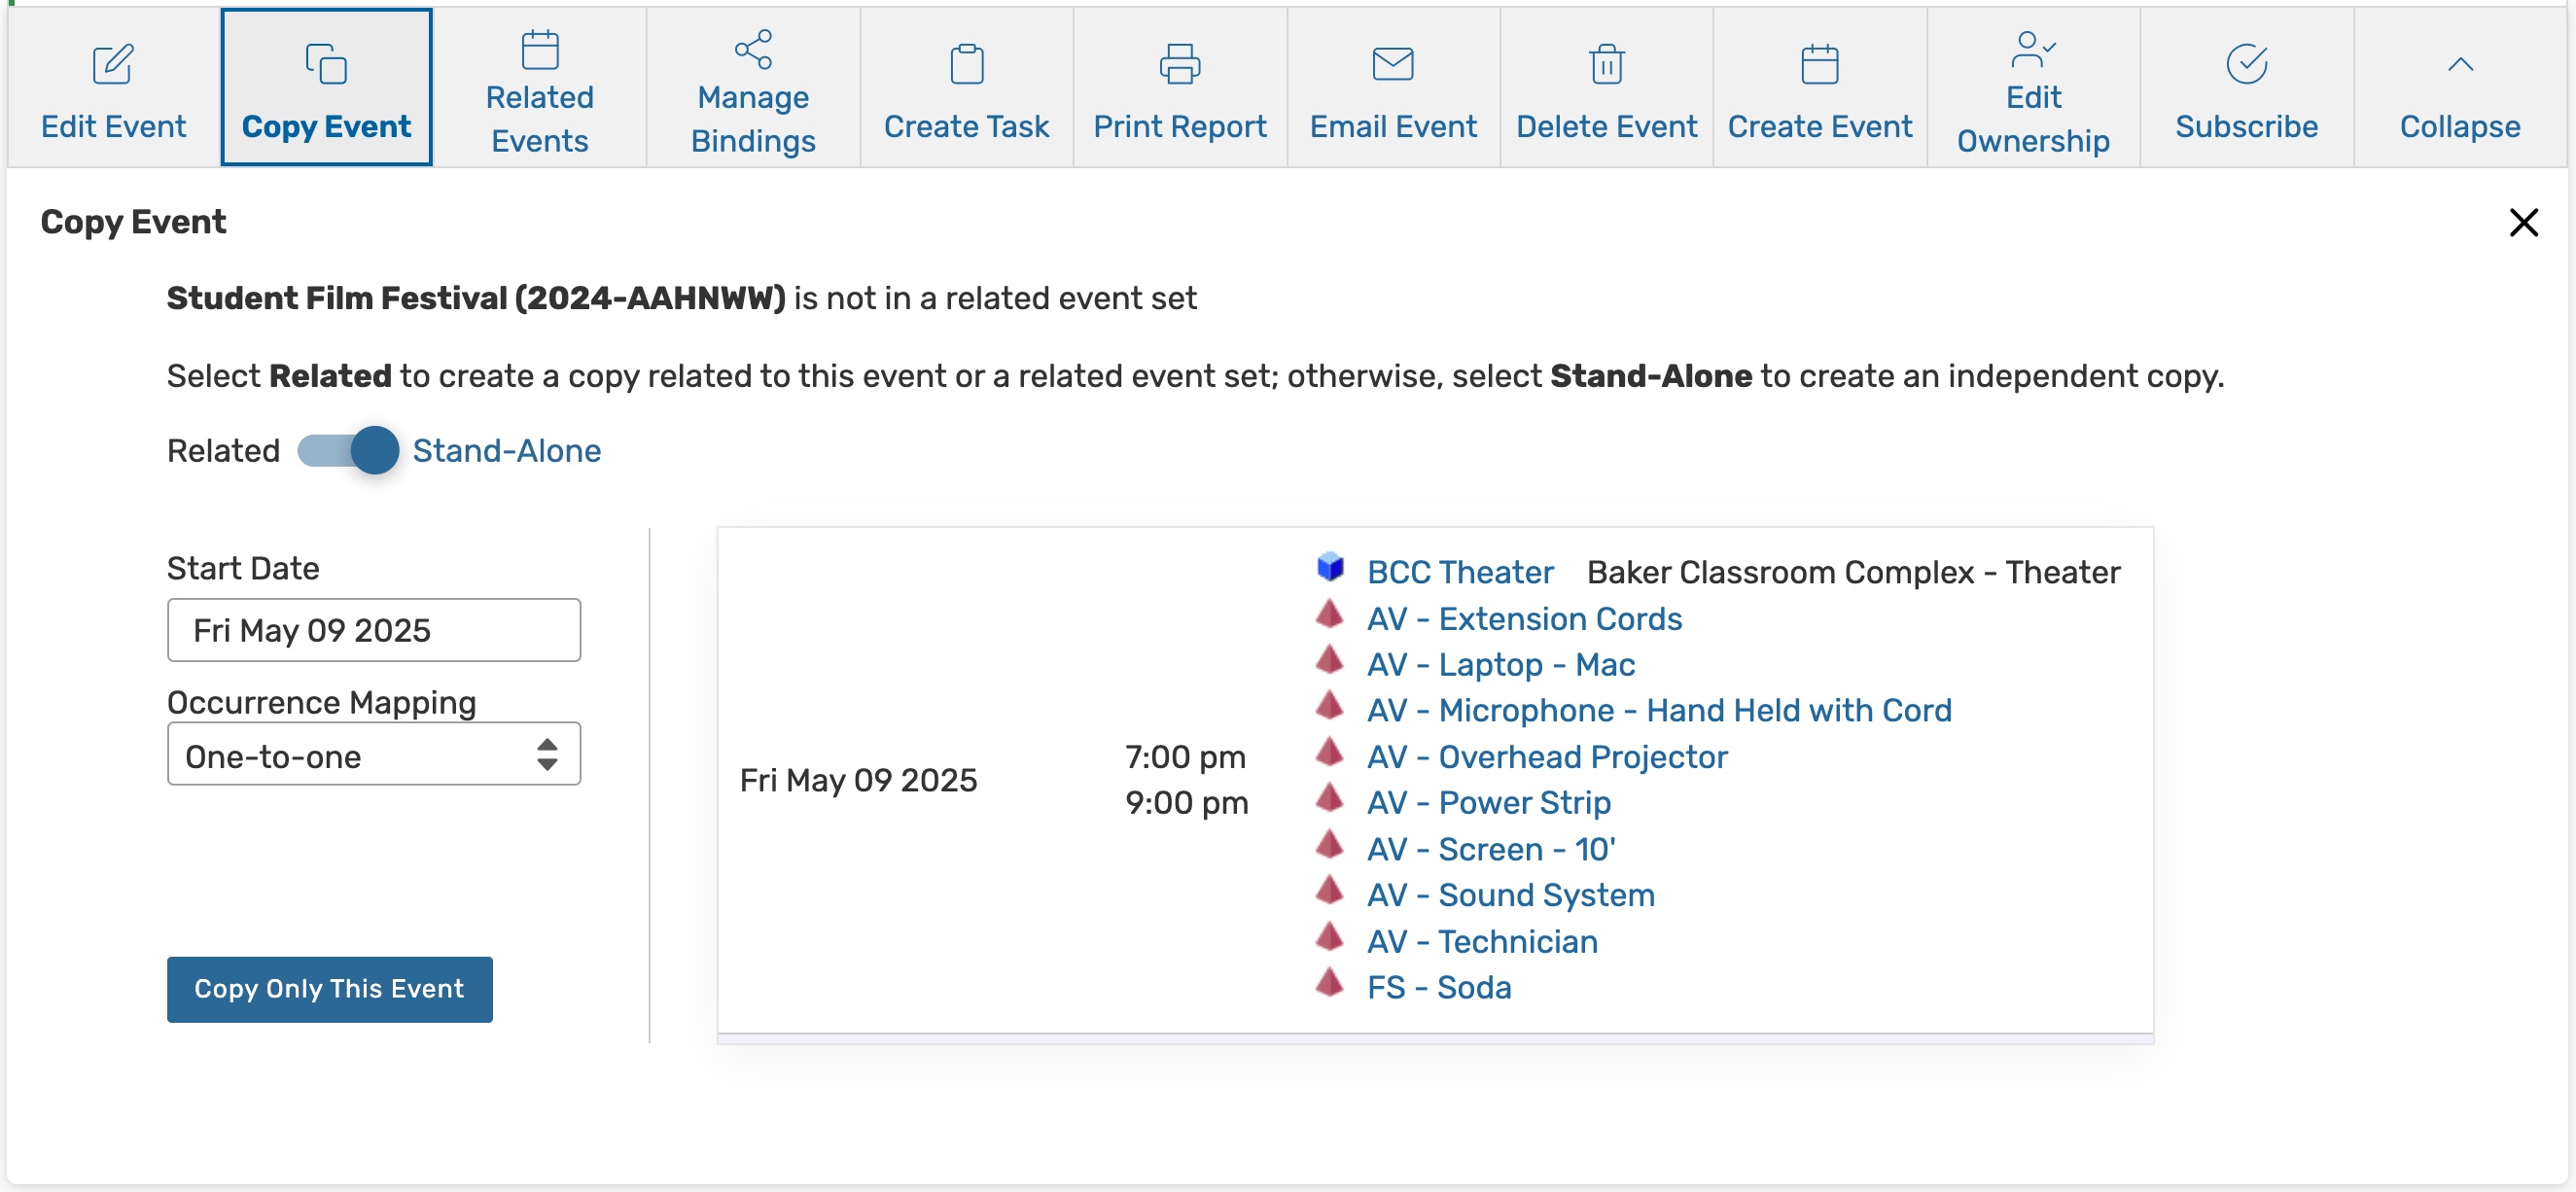 Image: Use the Copy Event button to open the event form with a copy of this event's data added.
Related Events
Update this related event set.
For more information, see Creating Related Events & Editing Related Events.
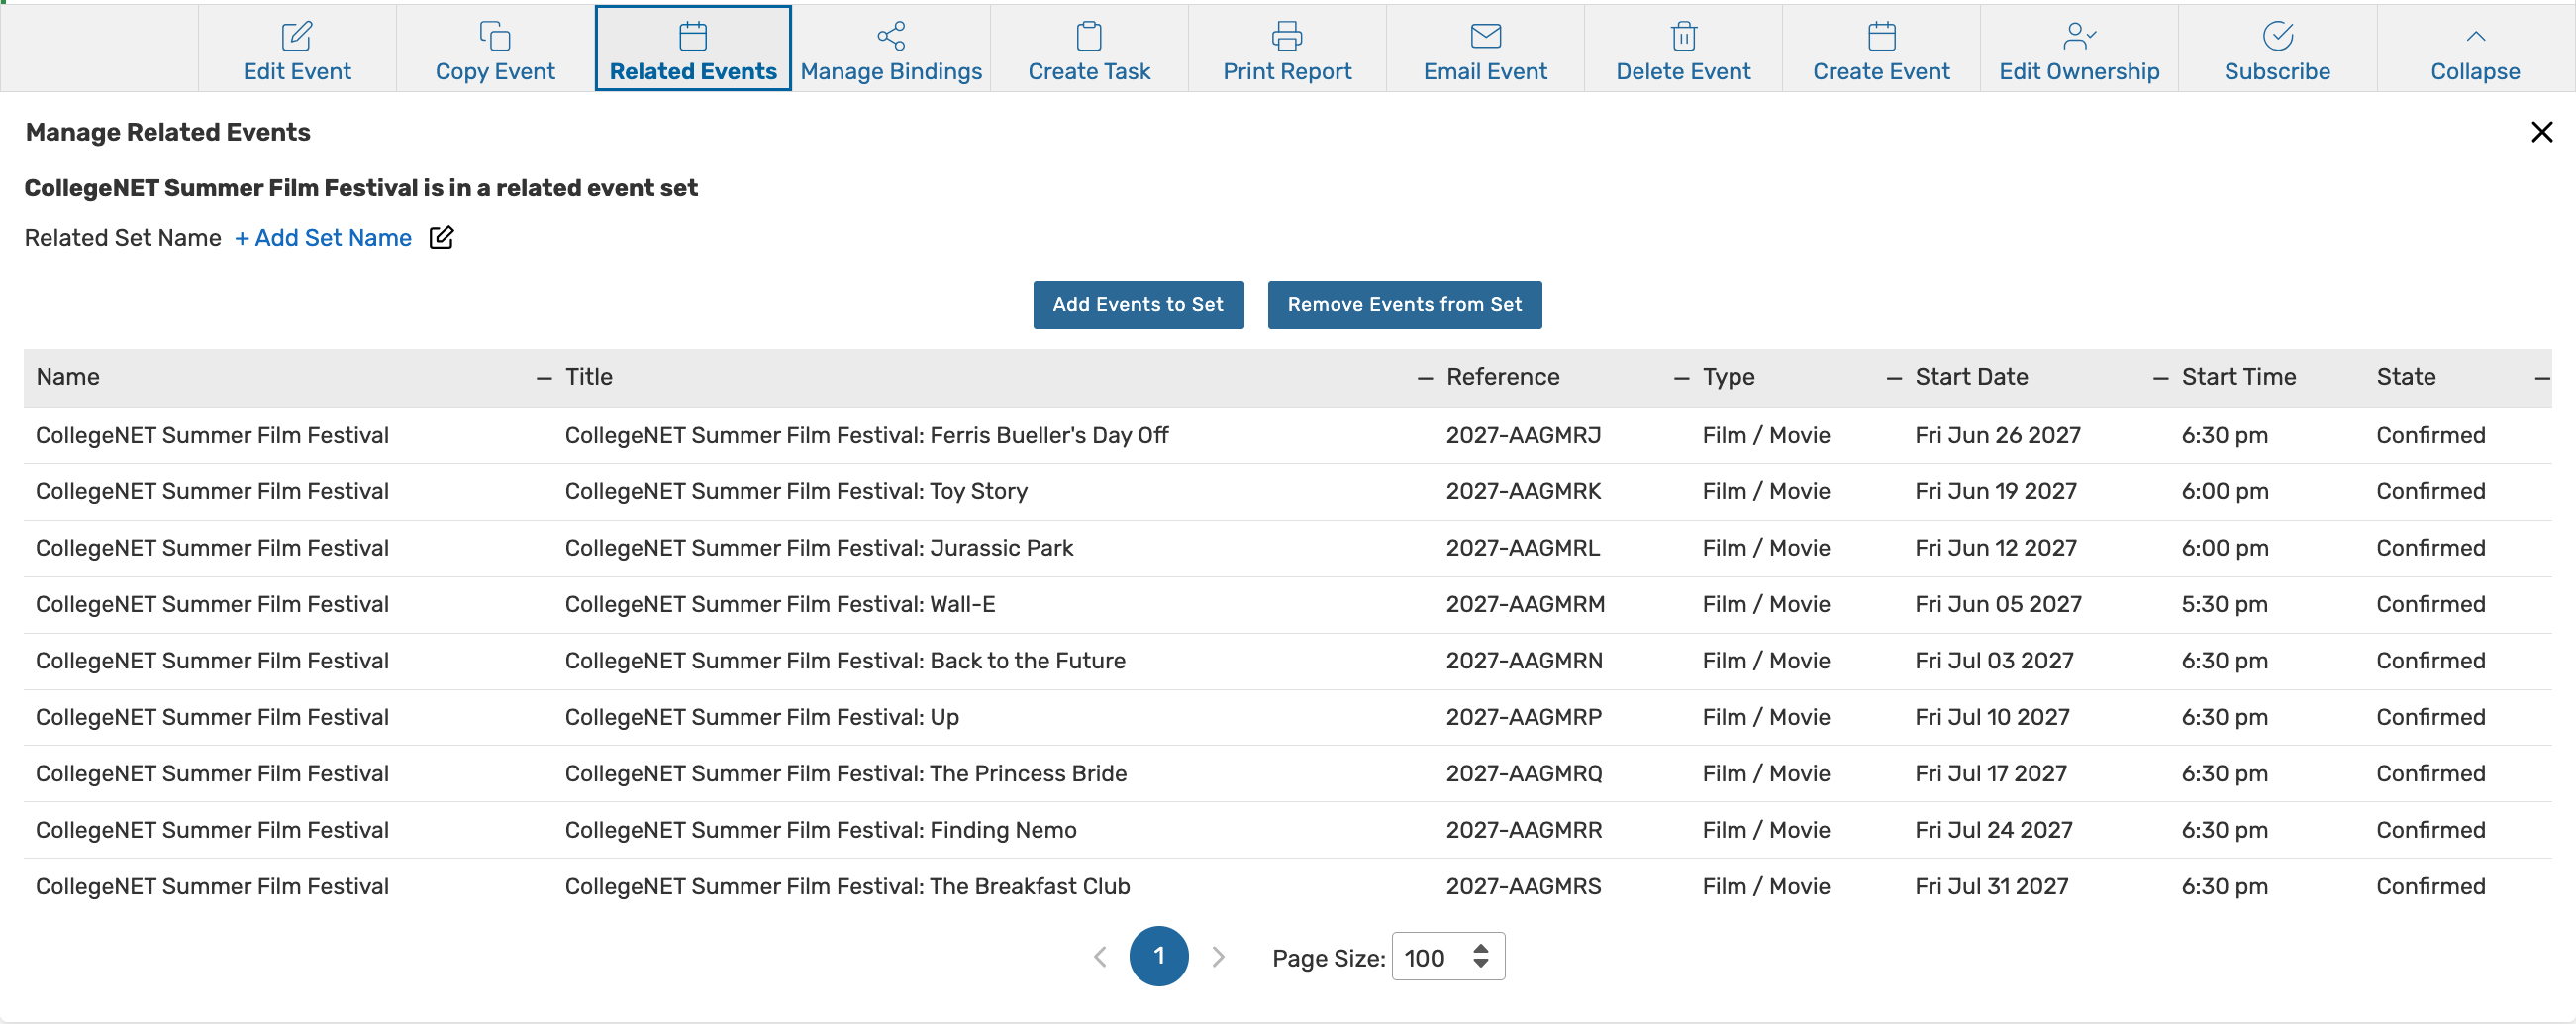 Image: Add and remove events from a related event set in the Related Events section.
Manage Bindings
Create or edit events that are bound to this one.
For more information, see Creating Event Bindings & Removing Event Bindings.
 Image: Add and remove event bindings from the Mange Bindings section.
Create Task
Create and assign a To Do task.
For more information, see Creating To Do Tasks.
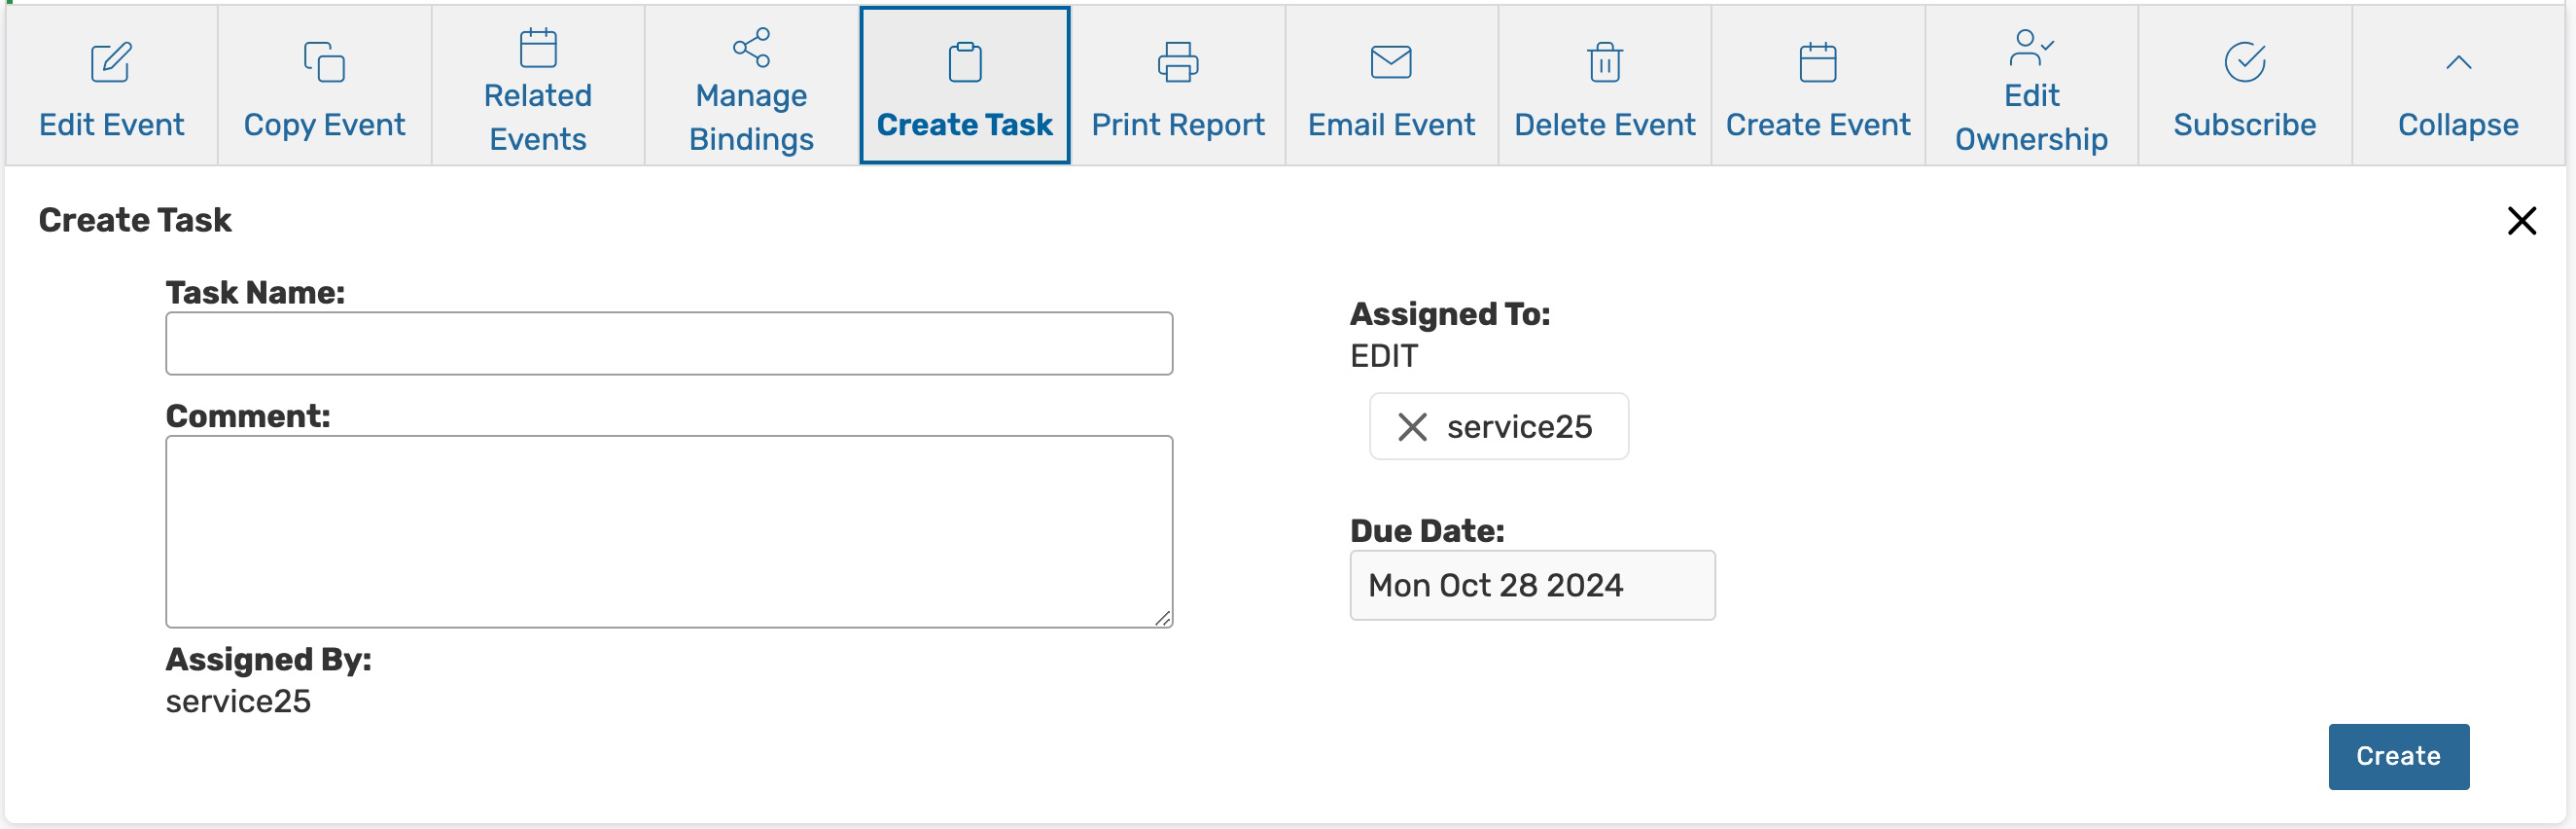 Image: Use the Create Task button to create a To Do for yourself or another user.
Print Report
Print a report (including invoices, if one has been defined for the current event type) or a custom document using information from this event.
Note: Setting Default Reports
Administrators can set the default confirmation and invoice reports in System Settings > Master Definitions > Event Types.
For more information, see Utilizing Custom Documents, Defining a Custom Report, & Adding and Editing Event Types.
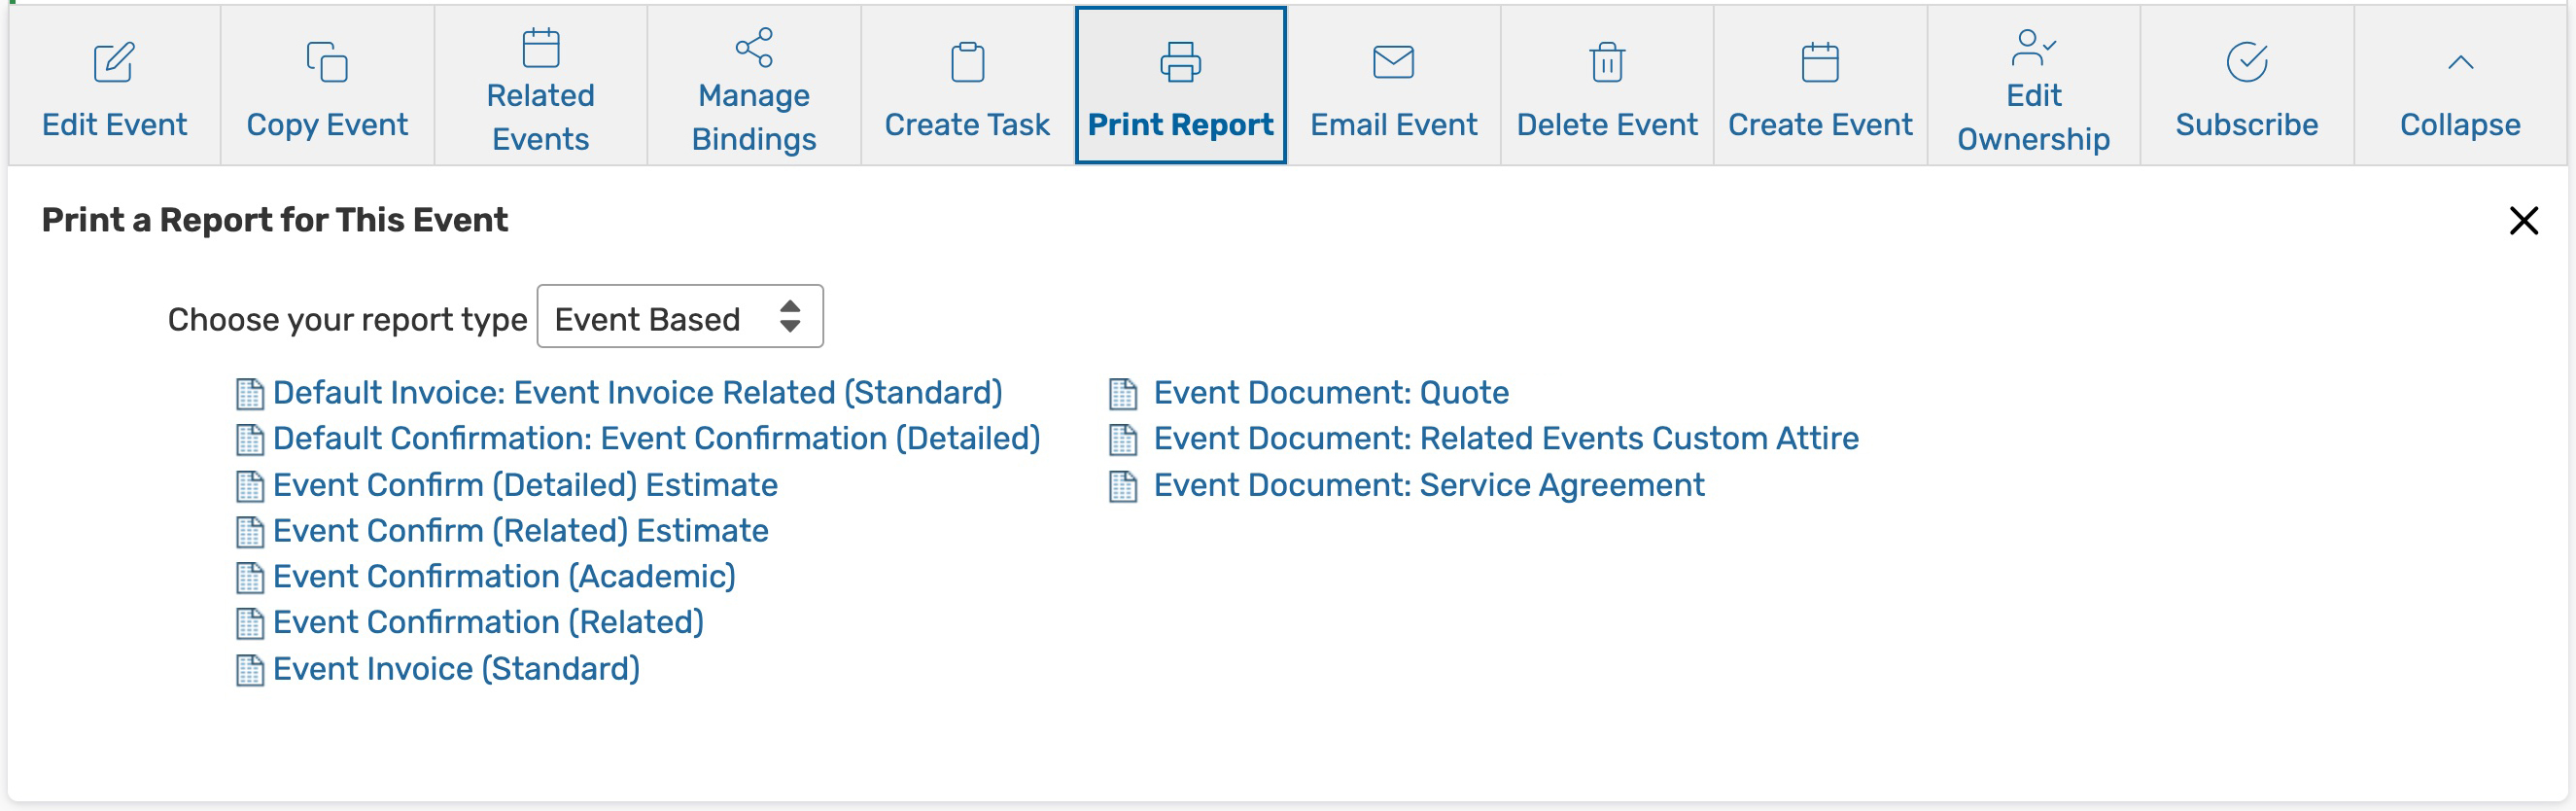 Image: Your report list will be based on the reports attached to your instance's event types.
Email Event
Send event details and attachments via email.
For more information, see Emailing Event Details.
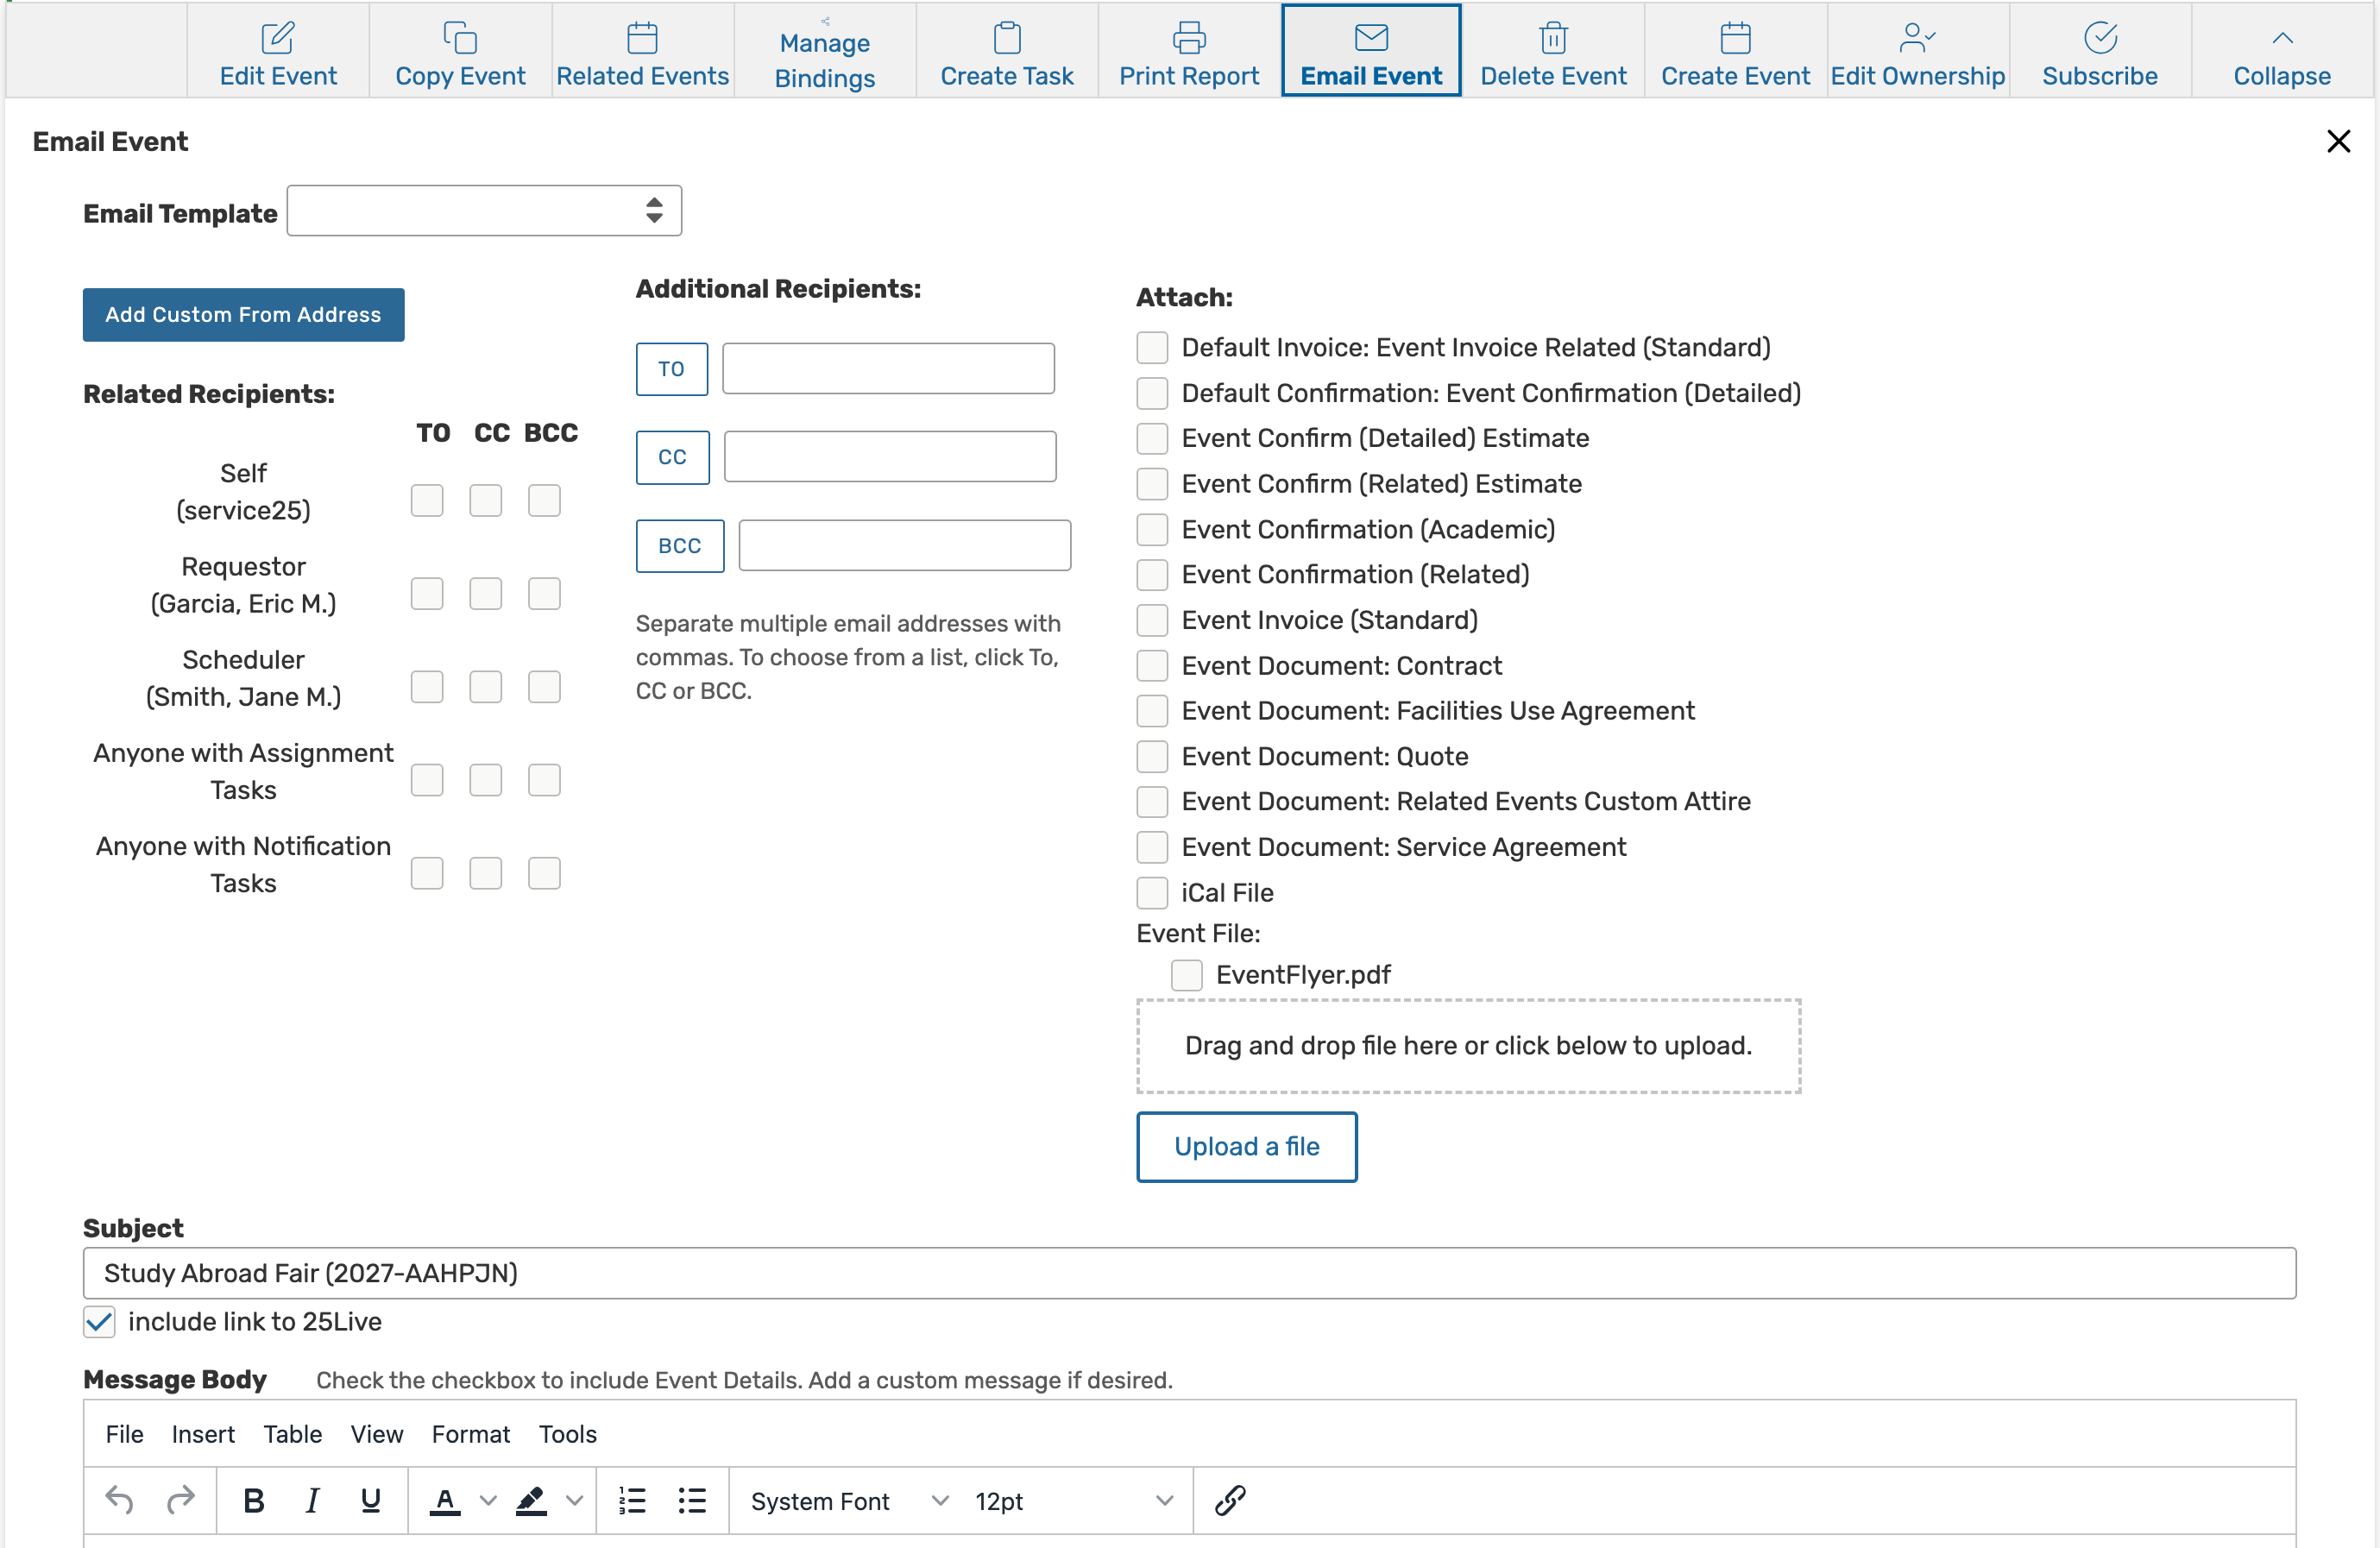 Image: Send a custom email with attachments in the Email Event section.
Delete Event
Permanently delete an event.
For more information, see Deleting Events.
 Image: Tap Delete Event to permanently remove it from 25Live.
Create Event
Open a blank event form.
For more information, see Creating Events With the Event Form.
Edit Ownership
Change the event owner to your contact with editing rights.
For more information, see Editing Ownership of Events.
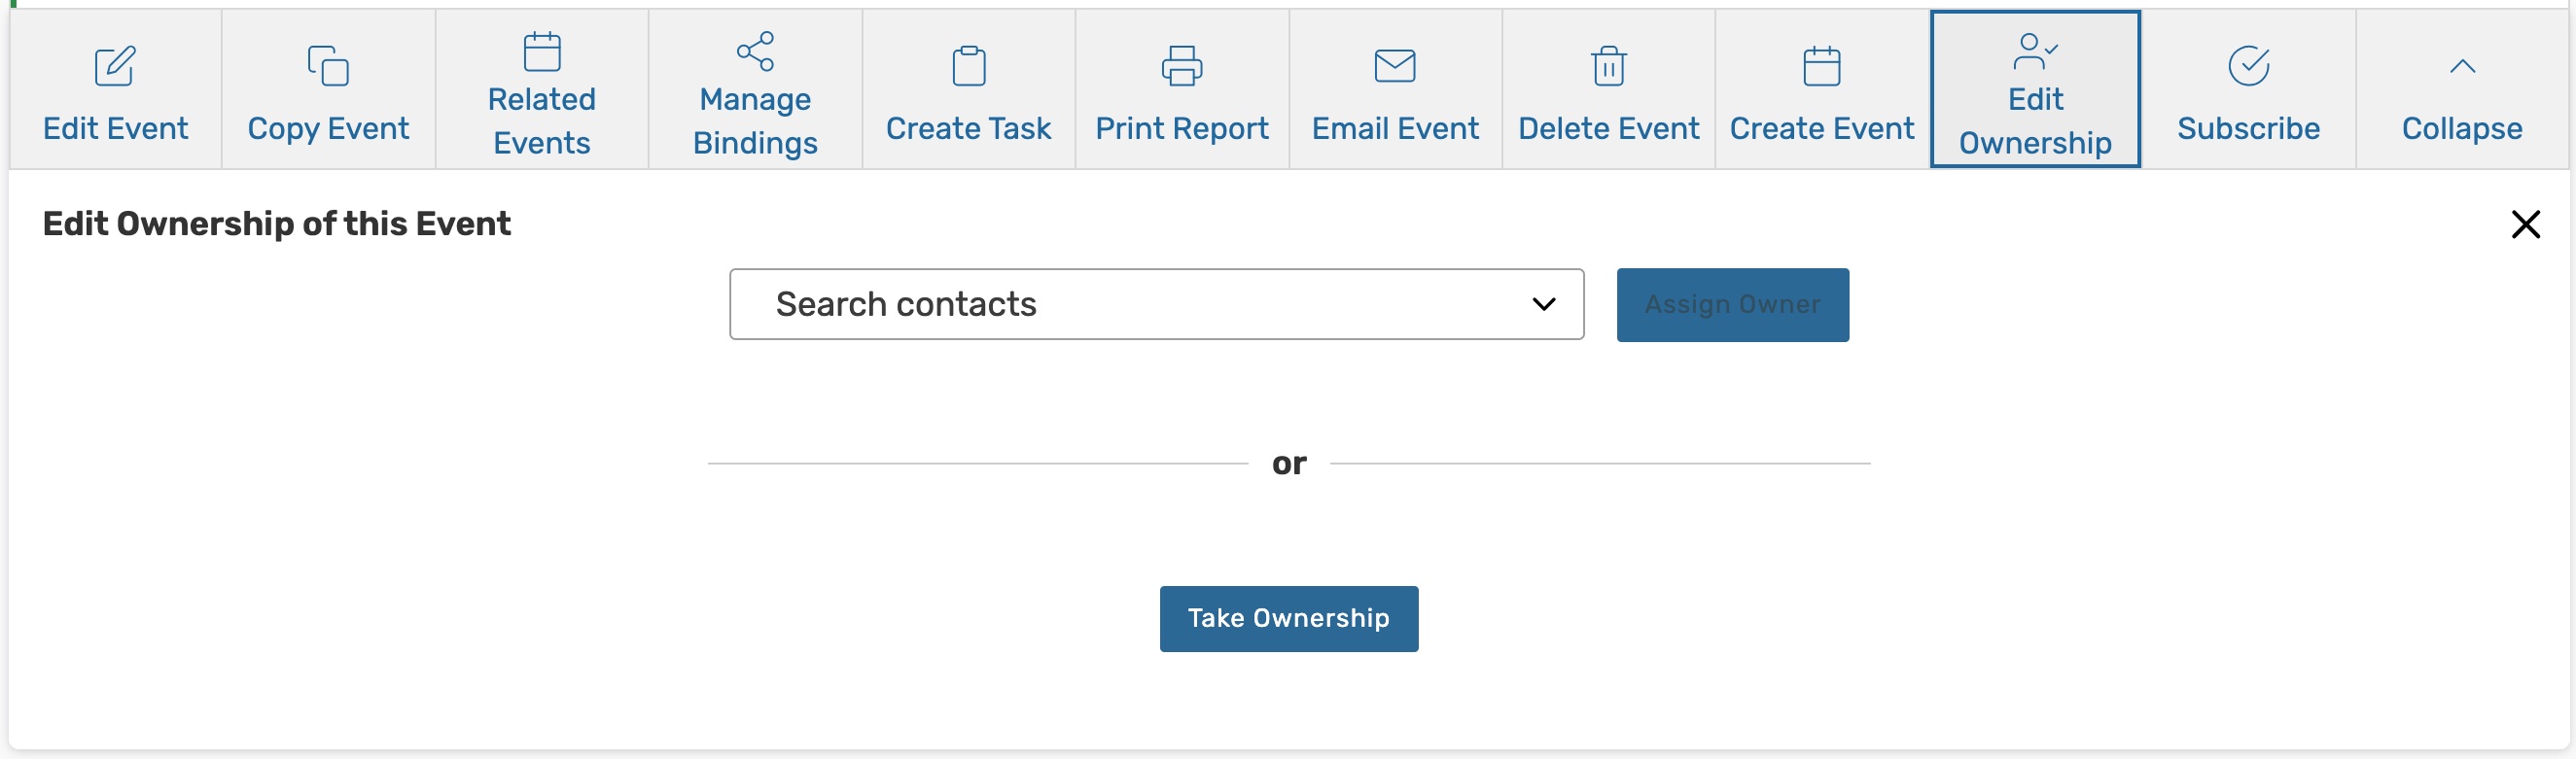 Image: Use the Edit Ownership button to change the event's owner. |  Image: On mobile, the more actions menu and edit ownership. Image: On mobile, the more actions menu and edit ownership.
|
Subscribe to an event calendar feed.
For more information, see Subscribing to an Event Feed.
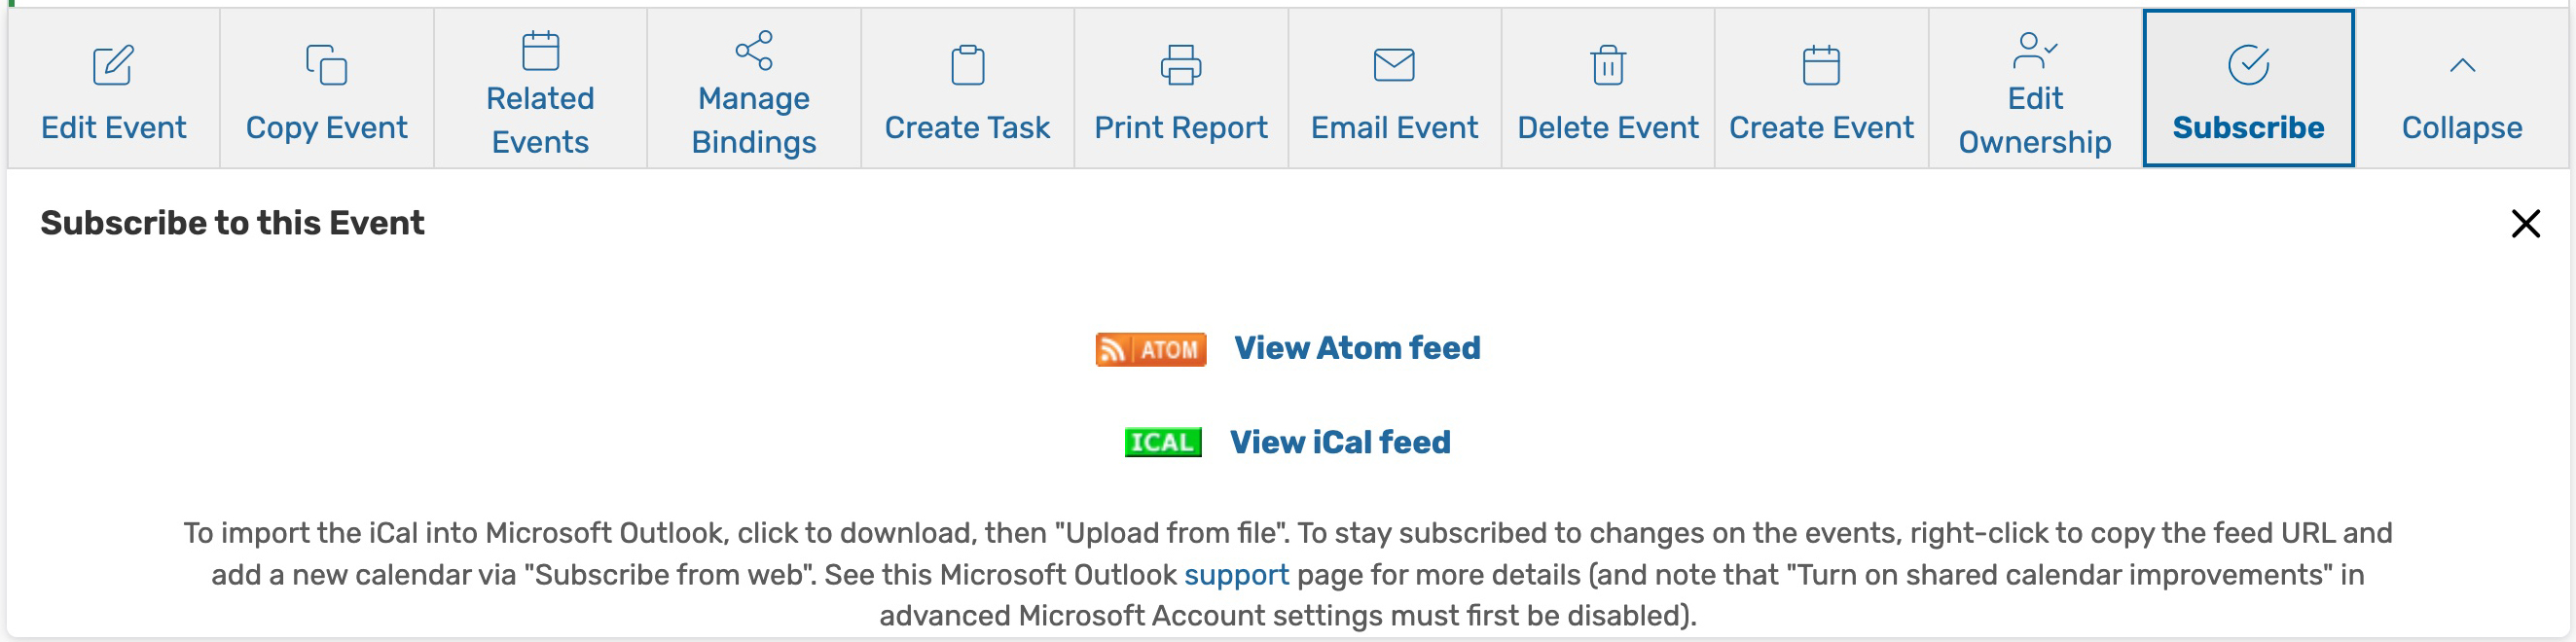 Image: Subscribe to an event feed.