Security Note
Functionality described here requires special permissions to be set up in Group Administration.
Viewing invoices and requesting payments in Payment Mode:
- Event editing (or higher) Object Security Permissions
- Basic Options: 4.0 View Pricing on Events = Yes
- Basic Options: 4.1 Edit Pricing on Events = Yes
Managing payments in Payment Mode:
- Basic Options: 5.0 View Payments on Events = Yes
- Basic Options: 5.1 Manage Payments on Events = Yes
Authorized users can request and track payments in the Payment Pricing Mode of any event's Pricing tab.
Tip: Integration with 7Point Solutions
If your institution uses 7Point Ops for event payments, you can easily integrate that system with 25Live. See Enabling 7Point Solutions Integration in 25Live as well as the customer webinar.
Navigating to Payment Management
1. Open Your Event's Pricing Tab in 25Live
In 25Live, navigate to the pricing tab of your event.
2. Set Pricing Mode to Payment
Pricing Mode needs to be toggled to Payment.
If the option is activated, for events where no invoices currently exist, when toggling to Payment Mode, you will see a yes/no option to convert existing standard pricing to a single invoice. If yes, an invoice will be created, bringing over any existing adjustments from standard.
- If subtotal adjustments exist, three options for converting adjustments are presented to choose from: Map to Invoice, Convert To Payment, or Exclude From Invoice
- When converting an adjustment to a payment, the payment is converted in an unpaid status with an option to add the payment status and (if applicable) the payment date
- Negative adjustments made in Standard Mode are converted to positive payments
- Converted adjustments to payments default to unpaid status
This option can be controlled by administrators with appropriate permissions in System Settings > User Defaults > Pricing Mode using the Convert an event's Standard Pricing to an invoice... checkbox.
Note: Switching between modes is not recommended. Adjustments made in one mode will not be reflected in the other. Your choice will remain “sticky” until changed.
 Image: Toggle Pricing Mode to Payment if it is on Standard.
3. Choose a Custom Invoice
To manage payments, the event must have a custom invoice setup. If one is not available, you will need to create one.
Requesting Payments
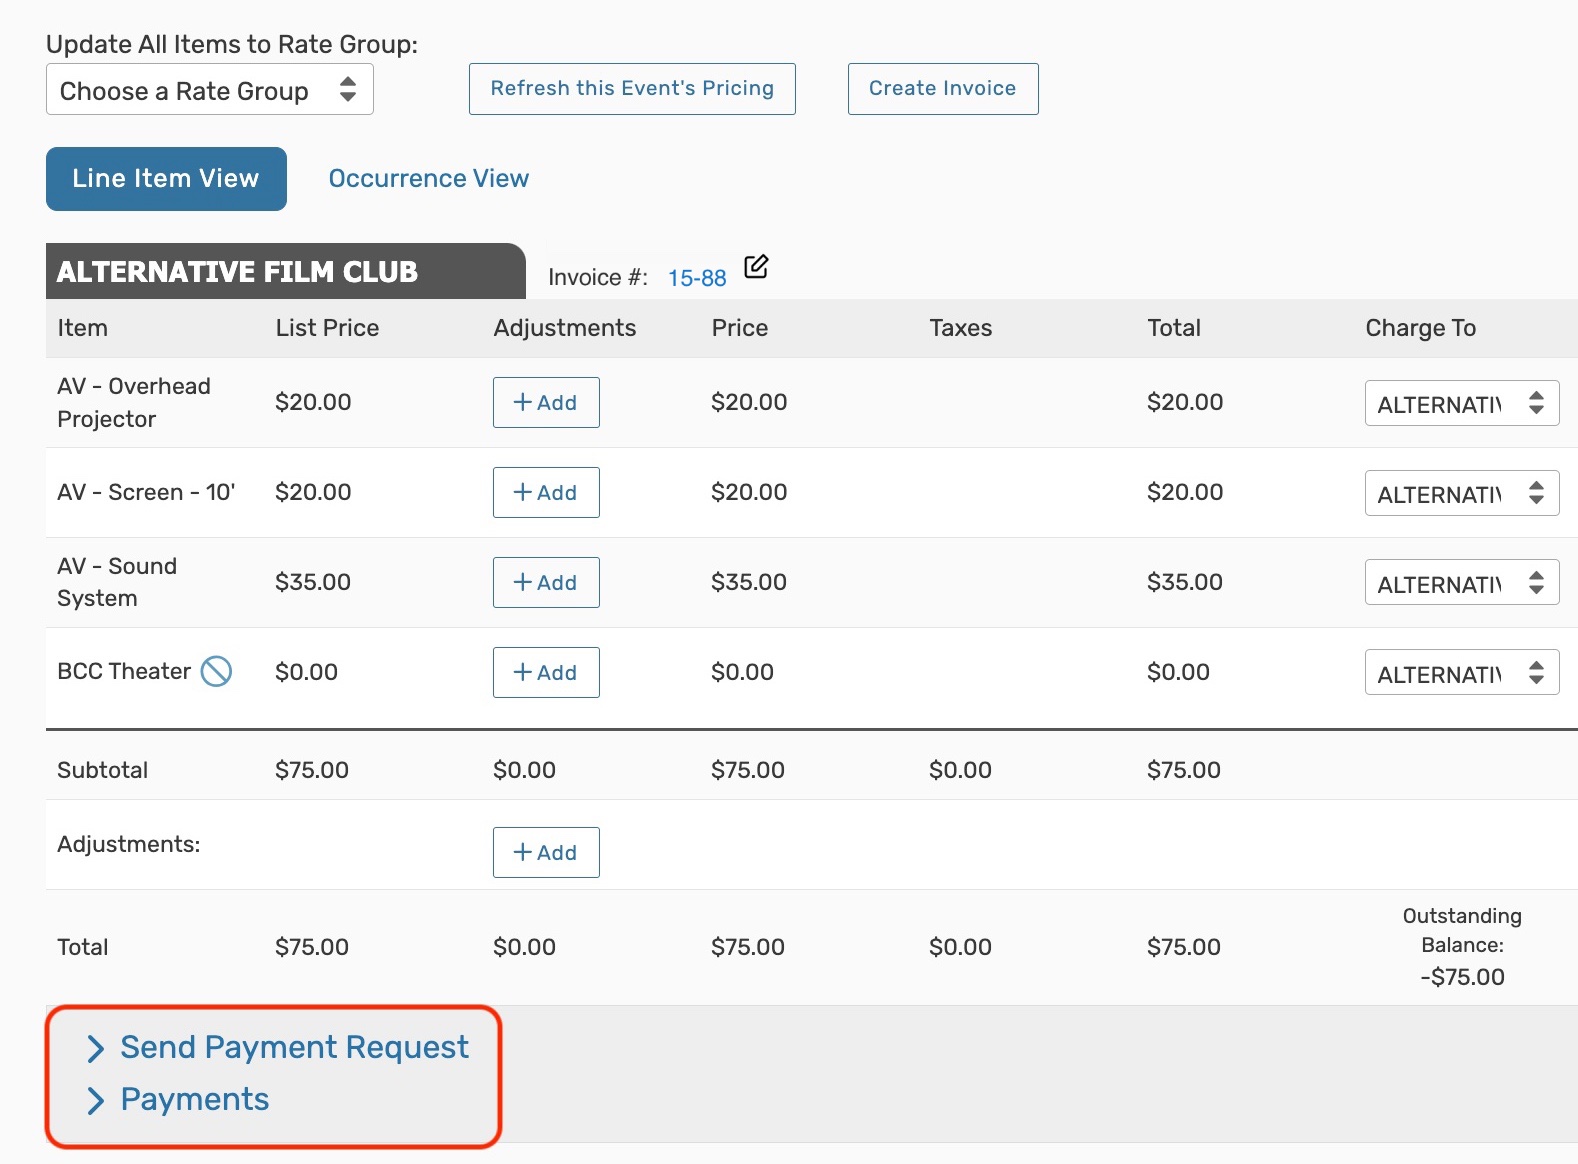
1. Find the Payment Section
Expand Send Payment Request.
 Image: Use the Manage Payments button to request a payment.
Tip: Editing the Invoice Number
While in Payment mode with a specific invoice selected, you may use the edit icon  to change the invoice number (80 characters, alphanumeric characters, and special characters allowed).
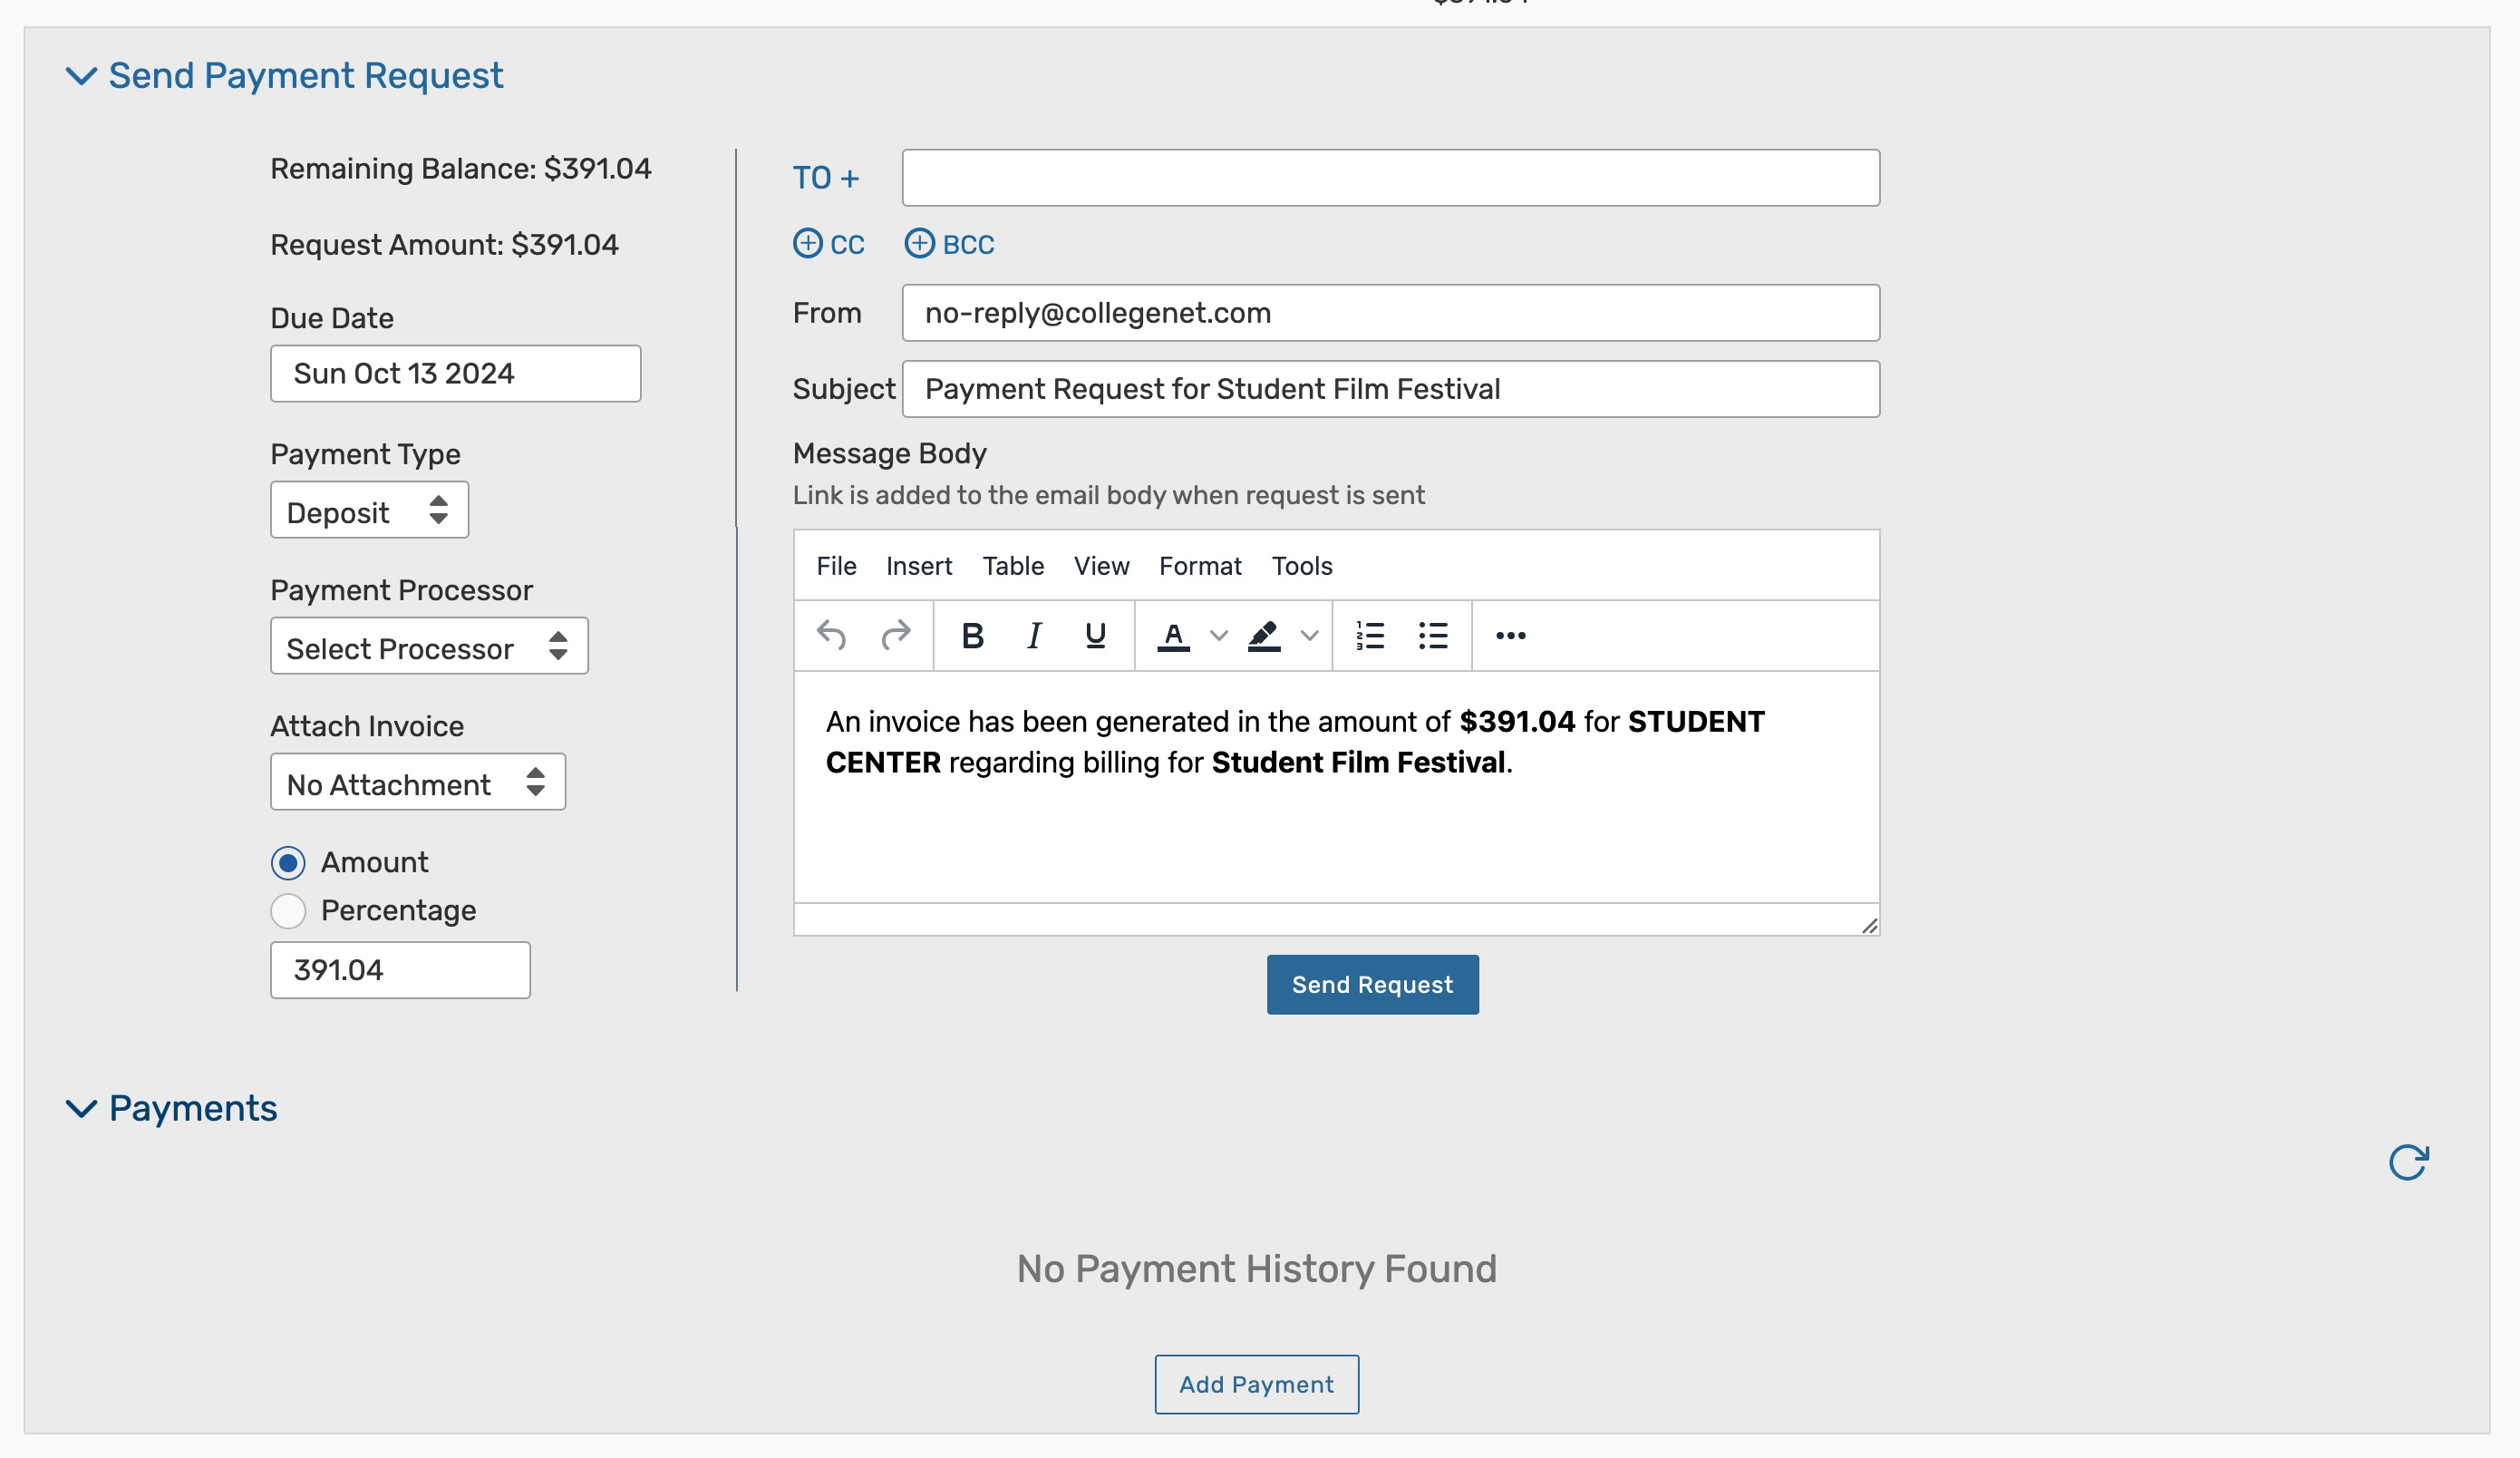
2. Enter Your Payment Information
- If desired, adjust the payment's Due Date.
- Use the Payment Type dropdown to update the type to Deposit, Balance, or Misc.
- Only one instance of the "Balance" type (non-voided) is allowed.
- When sending a payment request, a reminder email can be sent with payment details, but certain fields cannot be changed, as only one payment of this type is allowed.
- Multiple (non-voided) "Misc" and "Deposit" items are allowed. A message will alert you if other items of these types already exist.
- Only one instance of the "Balance" type (non-voided) is allowed.
- Choose to process the payment through Stripe, 7 Point Solutions, or manually.
- Select an invoice report to attach to the email.
- Choose whether to request an exact Amount or a Percentage of the remaining balance.
- Enter the requested payment amount or percentage in the text field.
- The Request Amount at the top will automatically reflect this update.
 Image: Set the payment information on the Send Request tab.
3. Enter the Email Information
- Enter the email address(es) of the user(s) you are sending the request to in the To, CC, and BCC fields. Then, use the From field to enter the email address that you'd like the request sent from.
- The To field will automatically populate the work email address of the billing contact if one is mapped to the organization that is being billed.
- Make any necessary updates to the Subject and Message Body.
- Stripe: The paymentLink variable
{{paymentLink("here")}}in the default text of the Message Body will generate a link that takes the user directly to the Stripe payment page that was set up in System Settings > Integrations. - 7 Point Solutions: The variable {{uniquePaymentIdentifier}} in the default text of the Message Body will generate a payment ID for users to copy into the 7 Point Solution portal. The paymentLink variable
{{paymentLink("here")}}will generate a link that takes the user directly to the portal.
- Stripe: The paymentLink variable
4. Review and Send the Request
- Review the email message and the requested payment amount. Click the Send Request button to email the request.
- Past request emails can be reviewed in the event's audit trail.
- Once sent, the payment activity will be logged to the Payments table.
- The Send Request button will be updated to Send Reminder once a request of one type is sent.
- If using 7 Point Solutions or Stripe, those integrations will be displayed in the Source column.
Tip: Locking an Invoice
When an invoice is selected, the section may show the Invoice Lock option. This can be toggled to prevent updates from reservation changes and formula changes. Once toggled on, the Update All Items to Rate Group dropdown and Refresh this Event’s Pricing button will be hidden.
Adding a Manual Payment Without Sending a Request
1. Find the Payment Section
Expand Payments.
 Image: Use the Manage Payments button to request a payment.
Tip: Editing the Invoice Number
While in Payment mode with a specific invoice selected, you may use the edit icon  .
.
2. Use the Add Payment Button
Use the Add Payment button.
 Image: Click Add Payment.
3. Edit the Payment Information
- By default, the table will fill in the details from the Send Payment Request section. Every field except ID, Create Date, Source, and Void can be edited:
- Every payment made in your instance will get an ID assigned automatically. This value will populate after you save the new payment.
- The Create Date shows the date the row was added to the Payments table.
- Use the calendar selector in the Due Date field to make updates.
- Adding a manual payment through the Add Payment button will set the Source to manual.
- Enter a Description of the payment
- Choose whether to request to add an exact Amount or a Percentage of the remaining balance to the payment. Then, enter the exact amount or percentage in the text field.
- Use the Type dropdown to record the payment as a Deposit, Balance, or Misc.
- Only one instance of the "Balance" type (non-voided) is allowed.
- Multiple (non-voided) "Misc" and "Deposit" items are allowed. A message will alert you if other items of these types already exist.
- Select whether the amount is currently Paid or Unpaid in the Status column.
- Add any additional comments in the Notes field. If needed, this field can be edited later.
 Image: Click and drag the bottom-right corner of the Description and Notes fields to expand those text boxes.
4. Save
Review your changes and click Submit Payment to save.
Tracking and Editing Payment History
1. Find the Payment Section
Expand the Payments section.
2. Review and Make Changes
- If the Source is manual, you can select Mark as Paid in the Status column at any time.
- Stripe and 7 Point Solutions payments will get marked as paid automatically after a payment is received in either platform.
Help With Sending or Receiving Payments
Funds transferred through Stripe or 7 Point Solutions are connected through third-party banking systems. If payments sent through either integration were not received, please check your Stripe or 7 Point Solutions account or reach out to them directly:
Stripe Support: https://support.stripe.com/
7 Point Solutions Support: https://www.7pointops.com/help
- Use the Notes field to update any past comments about the payment.
- Click Void and enter a reason for voiding to reverse a payment. This text will be displayed on the table after saving. Press Void to confirm.
 Image: Enter text in the Reason text box to add a void comment.
Tip: Search for all Events or Organizations That Have Invoices
Use the Has Outstanding Payments advanced search criteria to find all the events or organizations that have payments remaining.